AidLux开发者使用指南
平台信息
平台介绍
AidLux是一个构建在ARM硬件上,基于创新性跨Android+Linux融合系统环境的智能物联网(AIoT)应用开发和部署平台,基于ARM构建,为无处不在的智能设备赋能新生。
ARM硬件平台作为智能物联网世界的重要基石,在我们的生活中无处不在 - 手机、平板、机器人、家电、生产流水线...,是上百亿智能设备的心脏。
AidLux基于ARM而构建,可轻松部署于海量的智能设备之上,为其带来全新的赋能和创新体验,焕发新的生命力。
赶快找一部身边的ARM手机、平板,或基于ARM主板的设备开始体验吧!
跨Android + Linux融合系统,带来颠覆性的生态体验。
Android- 为用户带来了卓越的多媒体交互式体验以及海量的数字化生活应用生态; Linux - 基于安全、稳定、高效等优势,构建了服务端应用部署和应用(包含AI)开发的强大生产力生态。
AidLux,通过独特的Linux内核共享技术,将Android与Linux完美的融合在一起,为用户打造了一个全新的生态体验。
- 一个智能设备可同时获得Android和Linux两个系统原生体验,无需面对虚拟机跨系统方式带来的各种兼容性和性能烦恼。用户在拥有Android超过百万的娱乐、社交等应用的原生体验同时,还能直接访问原生Linux系统及其应用生态,立刻进入生产工作模式,生活、工作,无缝切换;
- 为开发者特别打造的跨系统 (Android、Linux) 交叉访问能力,不但可以让运行于不同系统环境中的应用实现高效互访,还能实现对系统层服务进行直接访问。应用场景不再局限于单一系统,为开发者打开了新的创意空间;
- 同时支持Android兼容设备和Linux兼容设备 (如:各种传感器、Arduino、机械臂、超高清工业相机、3D-ToF深度相机、网络相机等) 及各种接口 (如:4G/5G、LAN、WiFi、蓝牙、RS485、RS232等),即插即用,自由应对各种智能物联网场景方案;
历史版本
AidLux 1.4
发布日期:2023-03-31 Build ID: 1.4.0.696
[功能更新]
- 系统:无线调试功能用户体验改进,可自动点击对应按钮完成修改(1.3版本中Android 12 进程数量限制问题修复相关)
- 系统:OpenCV深度相机适配
- 系统:Aid 桌面改进:Web Terminal 添加特殊按键(Tab,ESC等)、桌面UI优化等
- 系统:Aid 桌面改进 - 用户登录密码采用非对称加密后进行传输,改进系统安全
- 系统:增加AppMonitor应用监控后台服务(appmon),支持用户应用进程的注册、状态监控与信息查询
- 开发:新增视觉AI应用开发框架 AidStream(基于Python),可在AidLux平台针对图像数据(图片,流媒体)进行可配置的流水线式AI应用开发,简化开发工作
- 开发:新增IPC开发框架AidIPC,方便Android-Linux跨系统应用间通信功能开发
- 开发:CVS Python模块添加对U3V类型相机设置FPS和分辨率的参数支持
- 应用:更新 ApkBuild 应用打包工具,开发者可将Python应用打包为可独立安装的Apk应用包
[问题修复]
- 系统:Linux桌面环境无法正常播放音频
- 系统:系统启动校验流程改进,避免校验过程异常造成无法进入系统的问题
- 系统:原生 Terminal 标题栏按钮异形屏适配
- 系统:多次安装卸载出现卡在启动界面无法进入系统的情况
- 系统:隐私政策下出现加载现象
- 系统:外接键盘与软键盘冲突问题
- 系统:原生终端软键盘锁定后复制粘贴问题
- 系统:系统初始化的过程点击屏幕不应弹出输入法
- 系统:初始化系统时点击最近键再返回初始化界面将消失
- 系统:未安装桌面时在非主线程进入terminal界面导致的UI问题
- 开发:U3V类型相机界面被释放时错误的显示报错信息
- 开发:模型加载推理过程中的一些异常的返回
- 开发:cameraDialog里的webview加载出错
最新版本
AidLux 2.0
发布日期:2023-08-23
Build ID: 2.0.0.1619
升级更新需要重新解压安装 Linux 环境,请先备份数据。
[功能更新]
- AidLux Linux系统环境升级更新为 Ubuntu 20.04,适应更主流的开发者生态
- 适配 Android 13/14,小米澎湃OS,华为鸿蒙4.0
- Aid桌面支持中英文切换
- AidLux web terminal 添加鼠标右键文本拷贝功能
- 全新 AidLux 应用仓库和 AppCenter,改进使用体验
- 功能增强的 AidLux 包管理工具 aid-pkg,提供了apt相似的使用体验
- AidLux外接键盘时可不显示软键盘
- AidLux 内置 Web 应用支持通过IP白名单进行访问控制
- 采用非对称加密对Aid桌面用户鉴权的密码进行加密
- 全新 AidLite SDK,提供更灵活强大的AI推理功能开发,新增 C++ API 支持
- 全新 AidStream SDK,提供基于 RTSP 视频流的硬编硬解功能,及推拉流功能快速开发
- 全新 AidCV SDK,替代原有CVS,提供更好的基于OpenCV的扩展增强功能支持
- 全新开发者文档: https://v2.docs.aidlux.com/sdk-api
下载安装
安装前置条件
- Android 系统为 64 位
- Android 系统版本 >= 13
- 设备 CPU 支持 arm64-v8a 架构
- 剩余存储空间 > 2GB (2.0.0.1619)
初始化
- 剩余存储空间 > 3GB (2.0.0.1619)
版本获取方式
- 个人版
访问AidLux开发者社区直接下载安装
- 商业版
访问AidLux官方网站联系我们试用
快速安装
手机应用商城下载安装,或者访问AidLux开发者社区直接下载安装
手机应用商城仅支持aidlux个人版下载安装
在Android/鸿蒙设备运行aidlux.apk即可安装; aidlux个人版因手机品牌差异略有不同,通常支持应用中心下载后自动安装,或使用安卓第三方应用商城下载安装包进行安装。 aidlux商业版安装问题请咨询客户经理。
启动
应用安装完成并首次启动,软件将进行一次Linux环境配置。
该环节根据网络环境及手机性能,大约消耗1~3分钟。
配置完成之后即可进入aidlux主界面。
如下所示,在Android系统中上滑调出AidLux App,点击启动。

桌面环境
Aid桌面环境
a)cloud_ip
该功能支持通过浏览器登录AidLux桌面
- 打开桌面Cloud_ip应用图标即可获得远程访问Aid桌面的网址
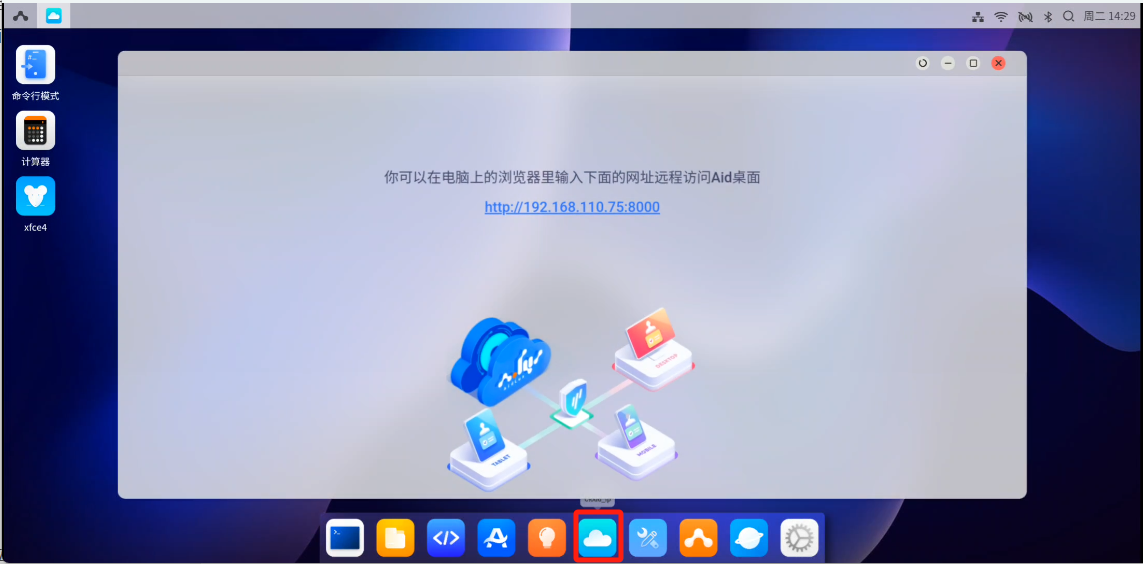
- 在浏览器中输入网址访问Aid桌面,访问密码为aidlux。

b)examples
打开桌面examples应用

应用中提供了一些AI应用实例,点击例子可在AidCode中查看实例源代码,点击run(运行)即可预览模型效果。

c)应用中心
- AidLux应用
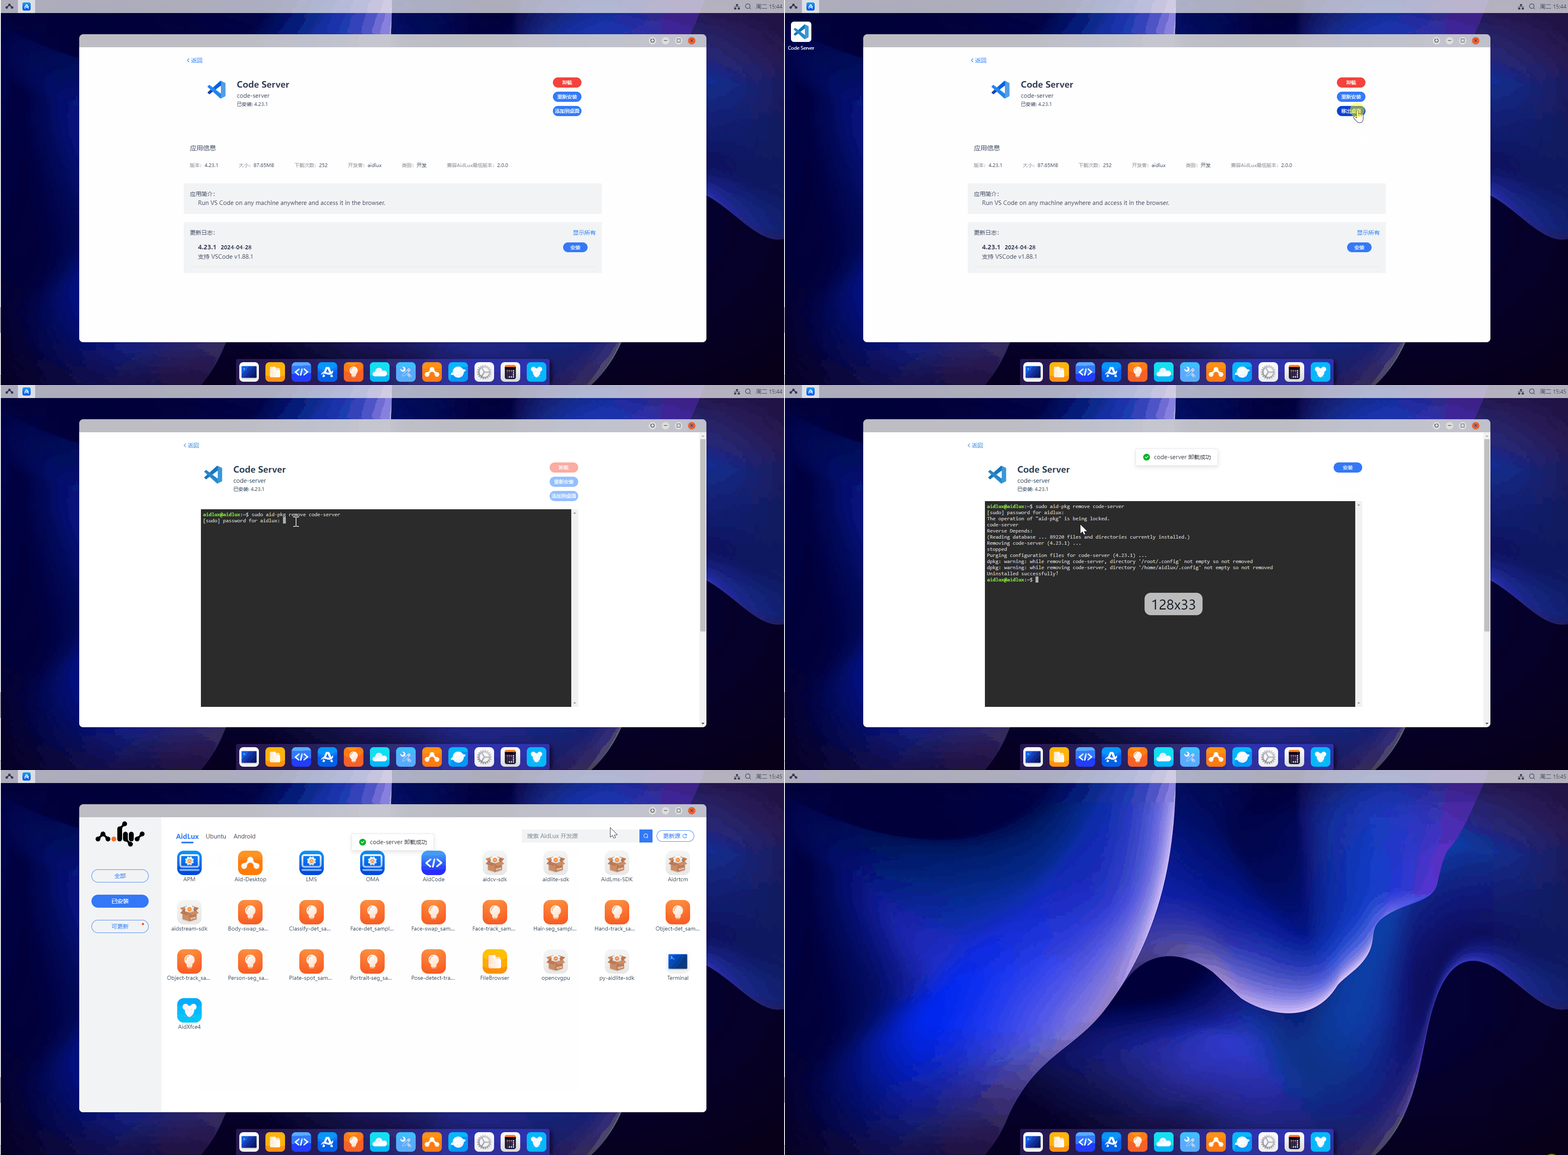
打开应用中心,在“AidLux”栏目下选择需要安装的应用图标,点击进行安装,安装应用的password为aidlux。

安装好的应用可在已安装tab中查看,选择已安装应用的图标,点击按钮可将其添加到桌面,点击图标即可使用。(在已安装tab中也可选择点击图标卸载相关应用)
- Android应用
打开应用中心,在“Android”栏目下选择需要添加的应用图标,点击后可选择“添加到桌面”,注意web远程桌面不支持Android应用查看,请在Android设备上使用该功能。随后可在Aid桌面看到已安装的应用,点击图标可开始使用,在应用中心的“Android”已添加tab中也可选择点击图标把相关应用从桌面移除。

d)aidcode
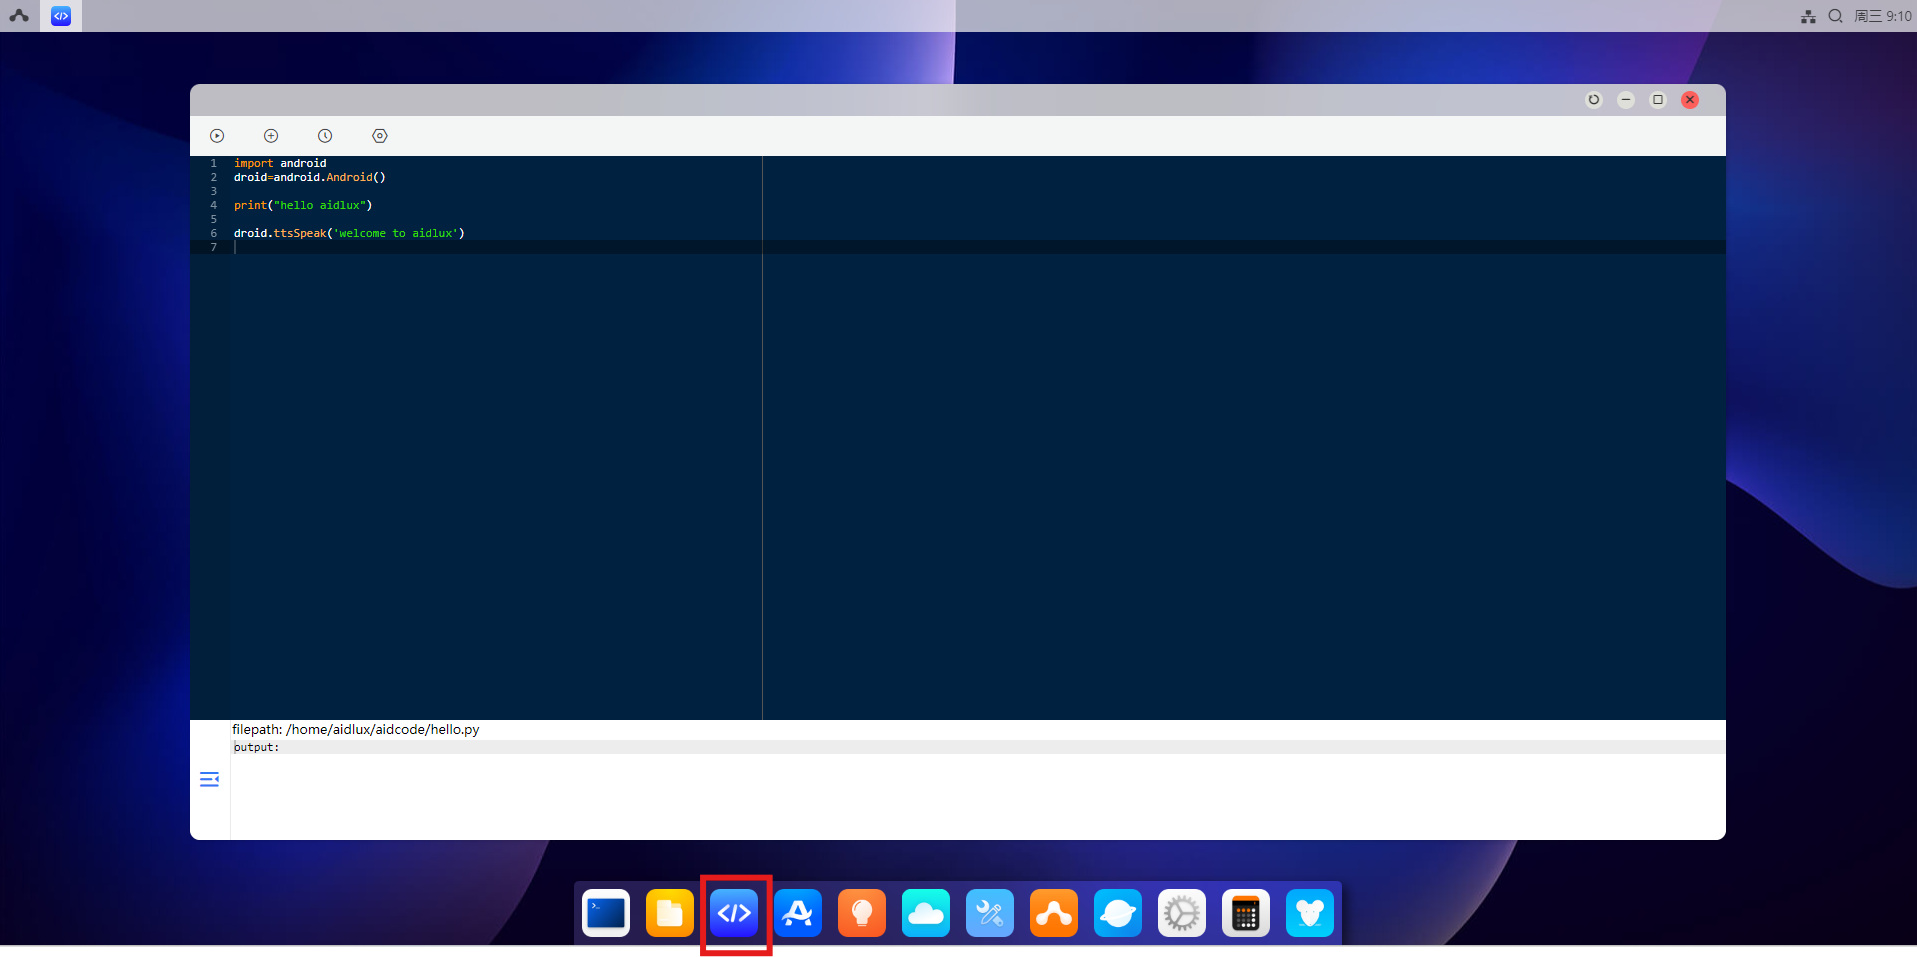
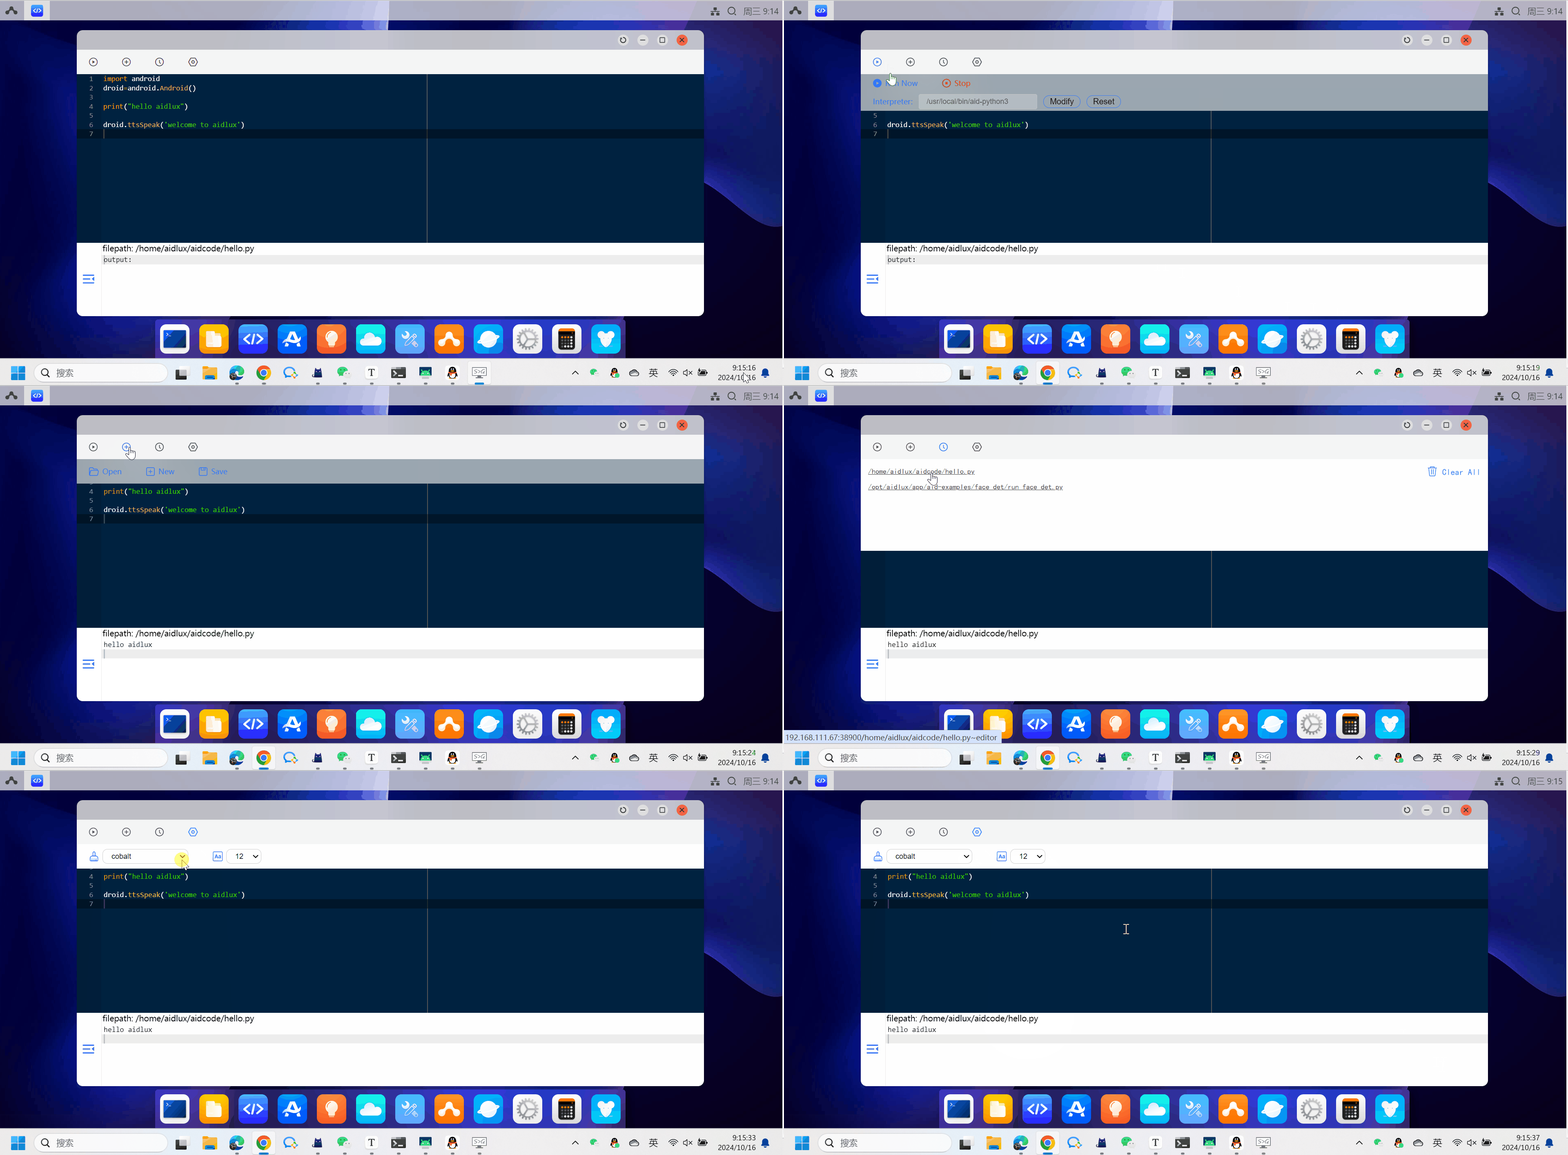
- 打开桌面AidCode应用图标,顶部为操作区域,底部为代码区域。
-
点击顶部第一个按钮将展开一个二级按钮菜单。
Run Now: 运行当前代码
Stop: 停止运行
-
点击顶部第二个按钮将展开一个二级按钮菜单。
Open: 打开python代码文件
New: 是新建python代码文件
Save: 保存python代码文件
-
点击顶部第三个按钮可以查看最近打开的文件。
-
点击顶部第四个按钮可以设置代码风格和文字大小。
⚠️ 注意: 不建议使用讯飞输入法
e)设置
- 打开桌面设置图标可以切换壁纸、修改桌面风格、调整显示设置、配置网络设置、以及在其他设置中修改系统语言设置。

⚠️ 注意: web桌面中不能进行桌面分辨率设置
f)launch-build
-
配置参数说明
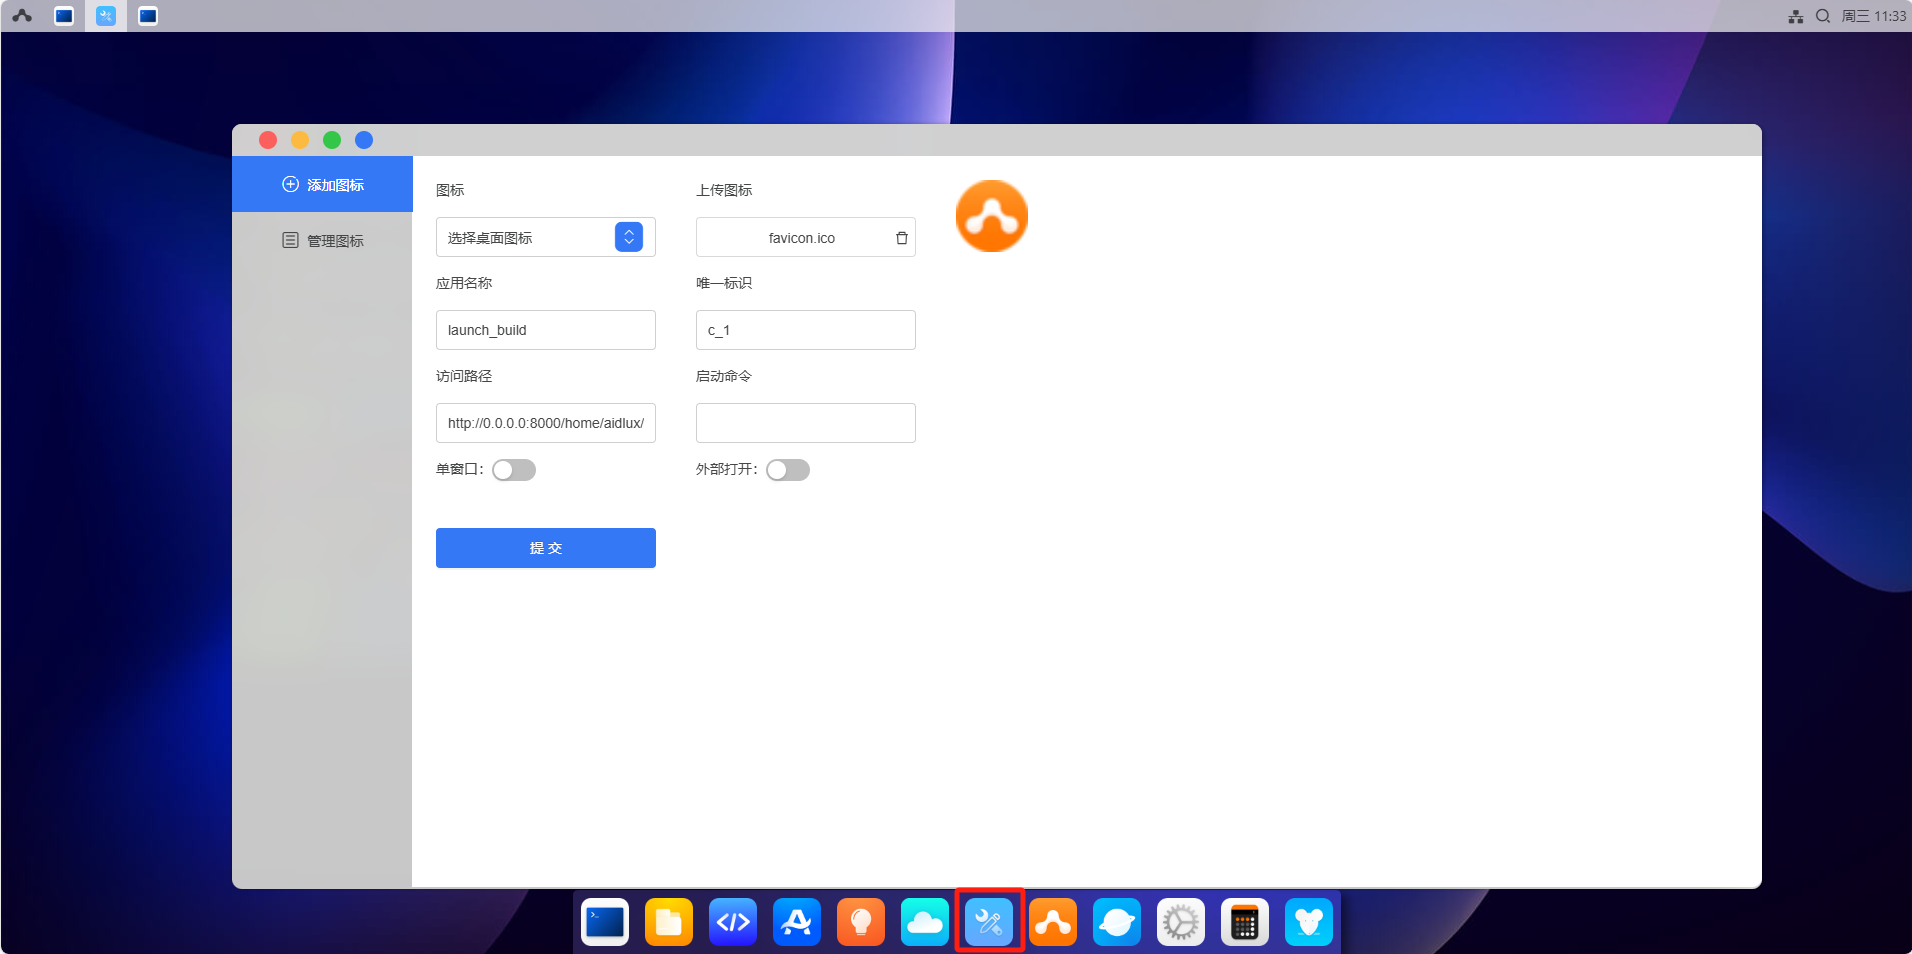
○ 图标
图标的设置有两种方式: 第一种从安卓设备或者远程访问使用的电脑,点击上传,选择图片文件即可上传。第二种点击填写aid系统中的目录,填写内容需从根目录开始到文件名称,
例如:> /home/aidlux/user_folder/icon.png
图标建议:使用png格式为佳,尺寸96x96或144x144最佳
○ 应用名称
应用名称可以任意指定,取一个喜欢的即可。
○ 唯一标识
该唯一标识用来保证添加、启动、移除等操作能定位到正确的启动图标。输入内容:英文大小写+数字+'_'+'-'等的任意组合。
例如: launch-build , launch_build 等,如有重复会给出提示。
○ 访问路径
访问路径需指定完整的URL,有如下几种形式:
aid系统静态链接:http://0.0.0.0:8000/home/aidlux/launch-build-test/index.html
aid系统动态服务链接:http://0.0.0.0:43236/xxx
建议:静态文件放置在 /home/applications/ 目录下,并且指定一个文件夹为宜。动态服务链接建议指定30000~65535之间,可以尽可能避免端口冲突。
另外aid系统目录的ip,最好填写0.0.0.0,这样可以保证在安卓端和远程桌面都能正确访问。
○ 启动命令
启动命令是一个可选项,当需要点击启动图标启动服务时,可以指定该项内容。该项内容会通过bash执行该启动命令,即填写你在linux命令行下输入的命令即可,请务必保证提供的启动命令正确,错误时将会启动失败,处于一直等待状态。
启动命令示例:
python3 /home/aidlux/launch-build-cmd/launch-build-cmd.py建议:填写完整的启动命令路径及必要的参数
○ 单窗口
即是否仅允许在aid桌面上只能打开一个窗口,如果已经打开了一个窗口,再次点击图标将会让聚焦到该应用上。设置外部打开时,该项不生效。
○ 外部打开
即在电脑浏览器上对应,新建一个tab页打开内容,在安卓设备上对应,新开一个webview打开该内容,该内容将以全屏形式打开,使用返回键或返回手势可回到桌面。该操作可能会导致桌面打开的内容丢失。
设置好以上参数后,点击提交即可在aid桌面上创建一个你自己DIY的图标。
-
添加一个静态html到桌面示例
打开launch-build,配置参数。
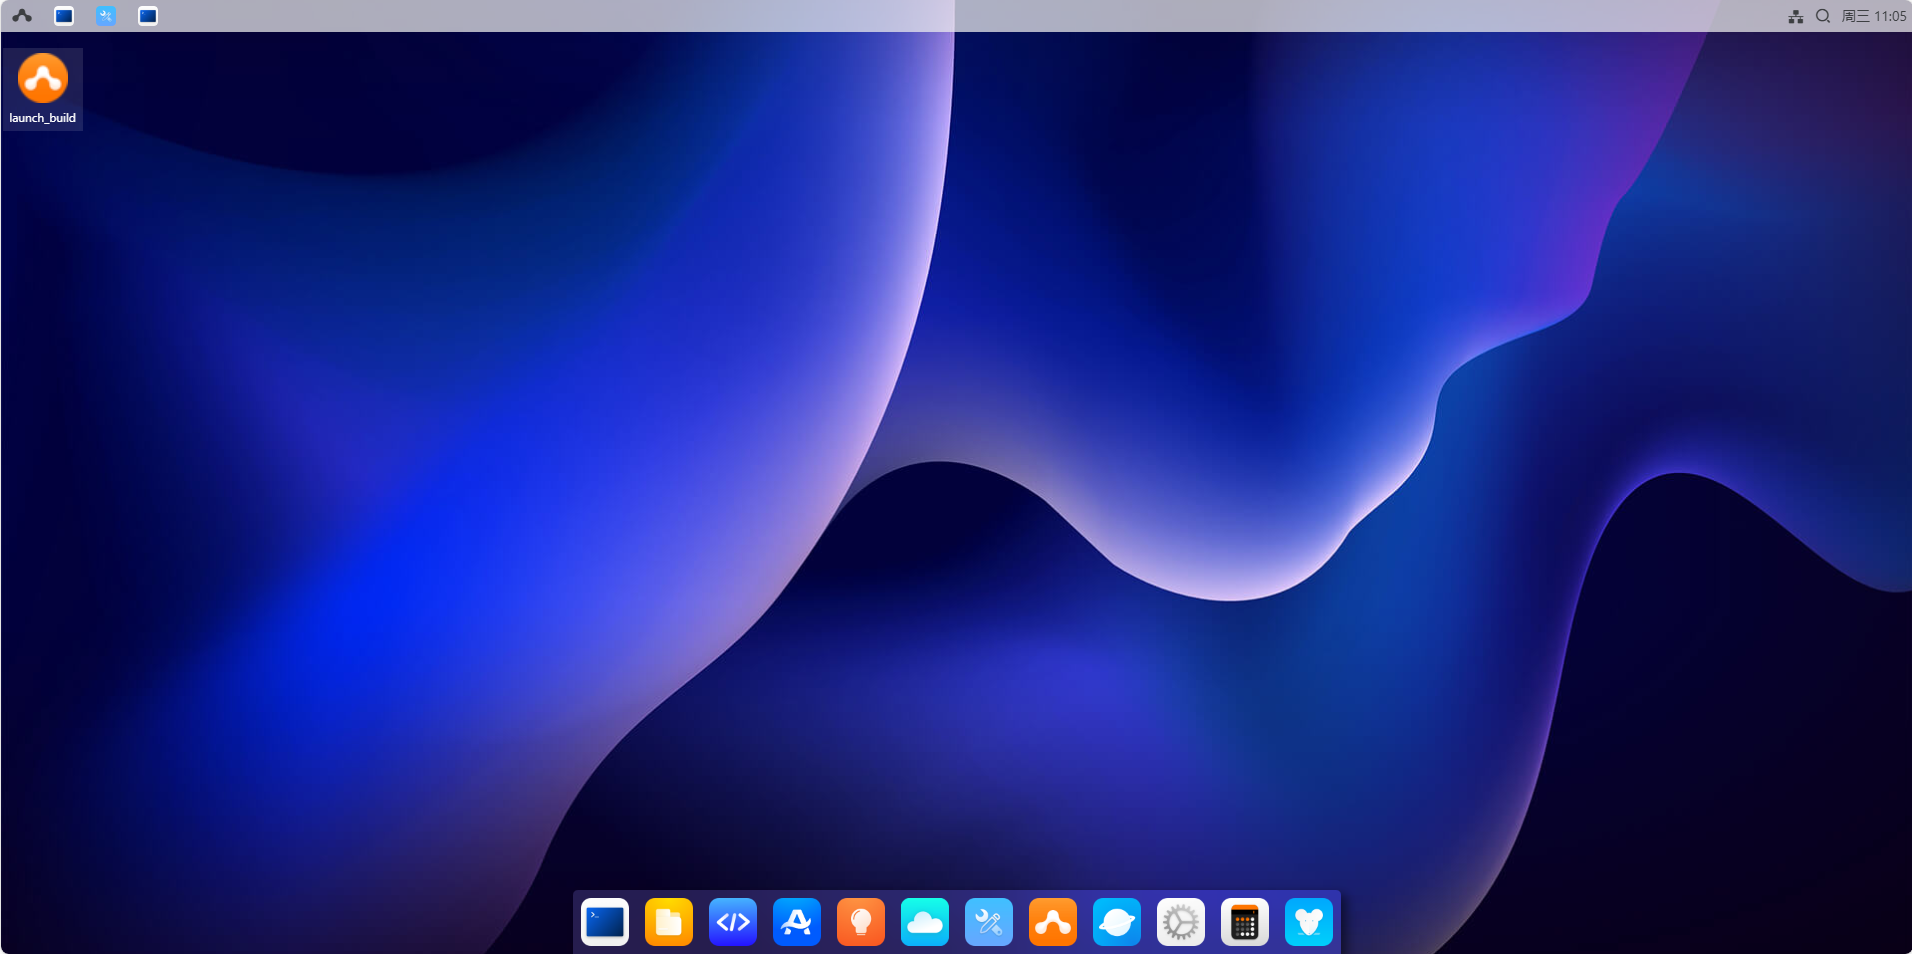
 点击提交,查看桌面已生成图标。
点击launch-build启动图标。
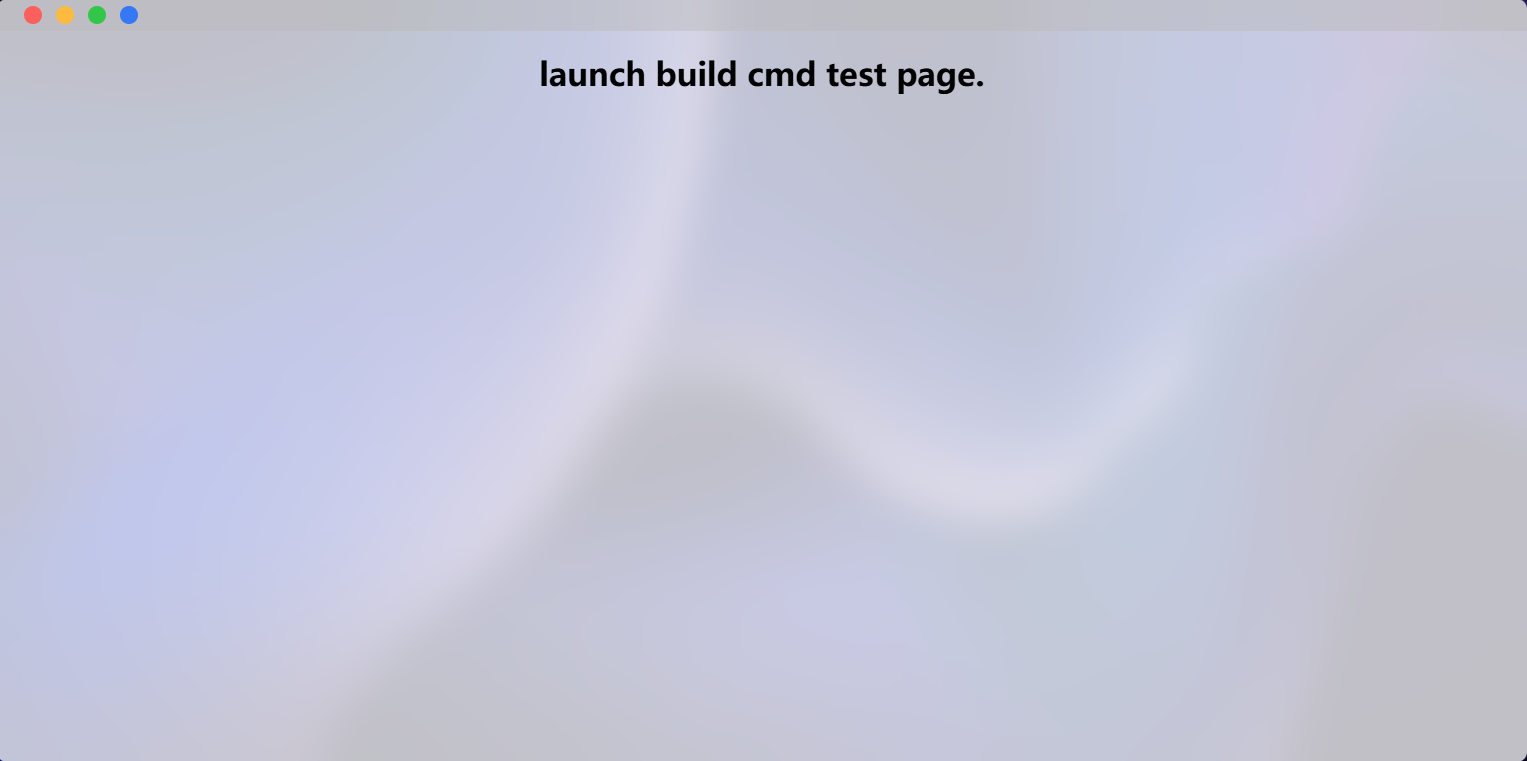
看到对应内容即说明设置成功。
- 设置外部链接示例
设置外部链接与静态html基本一致,仅设置的启动路径不同。

- 点击桌面生成的图标,能正常打开官网即表明配置成功。
设置动态启动服务图标
动态启动服务需要一个可以生成可以用于web访问的url及界面,方可进行。
在 /home/aidlux/ 目录下,创建了一个文件夹 launch-build-cmd ,该文件夹下包含两个文件:
○ index.html,用于显示内容
<!DOCTYPE html>
<html lang="en">
<head>
<meta charset="UTF-8">
<meta http-equiv="X-UA-Compatible" content="IE=edge">
<meta name="viewport" content="width=device-width, initial-scale=1.0">
<title>launch build cmd test</title>
<link rel="stylesheet" href="iconfont.css">
</head>
<body>
<h1 style="text-align: center;">launch build cmd test page.</h1>
</body>
</html>
○ launch-build-cmd.py 用于启动一个端口,62362,用于展示html内容
import os
from flask import Flask, render_template, Response, make_response, request
from flask_cors import CORS, cross_origin

app = Flask(__name__, static_folder='./',static_url_path='', template_folder='')

@app.route('/')
def cur_camera():
	return render_template('index.html')

if __name__ == '__main__':
	app.run(host='0.0.0.0', debug=False, port=62362)
有了以上内容,开始配置参数(图标可随意选择):
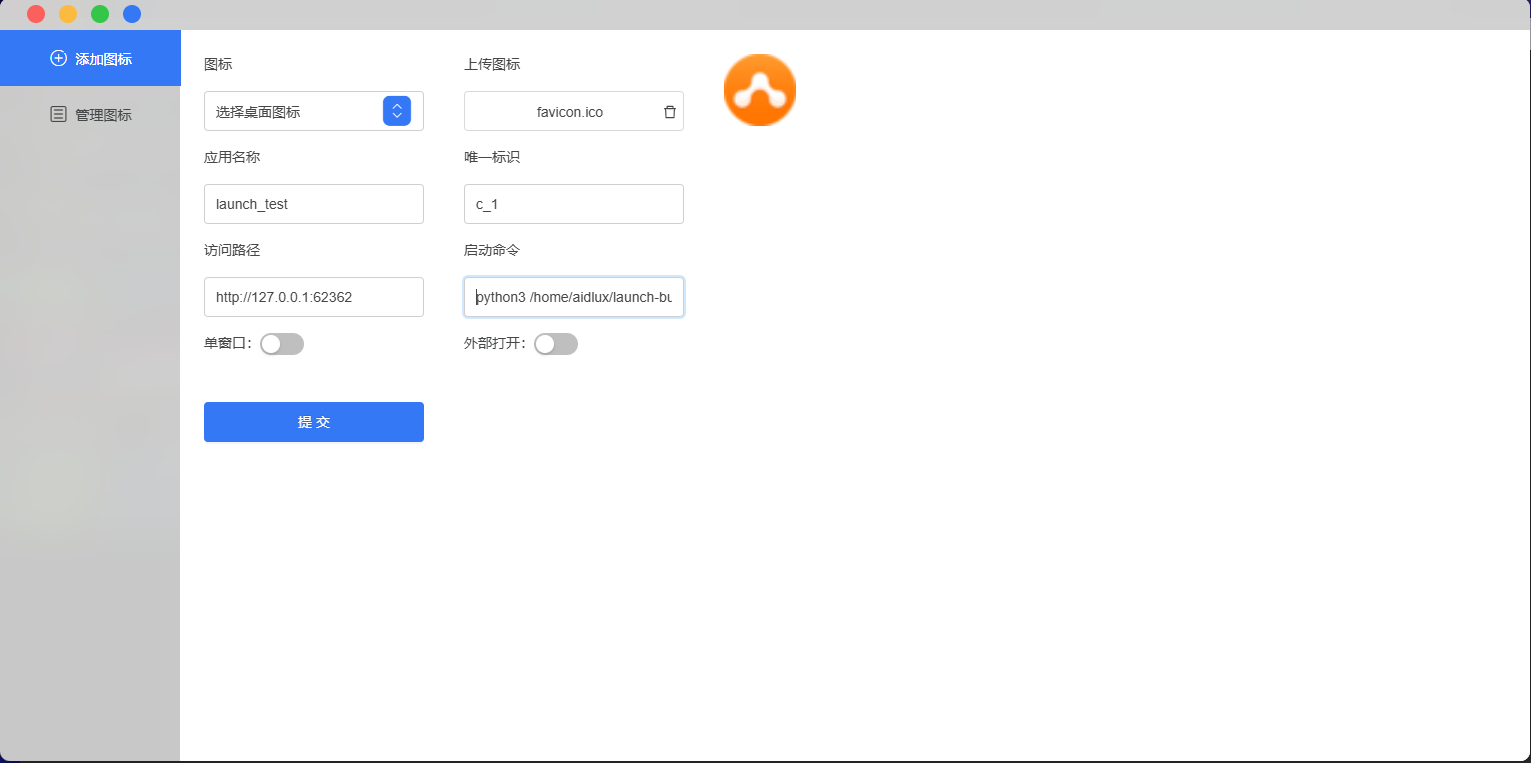
启动命令为:
python3 /home/aidlux/launch-build-cmd/launch-build-cmd.py
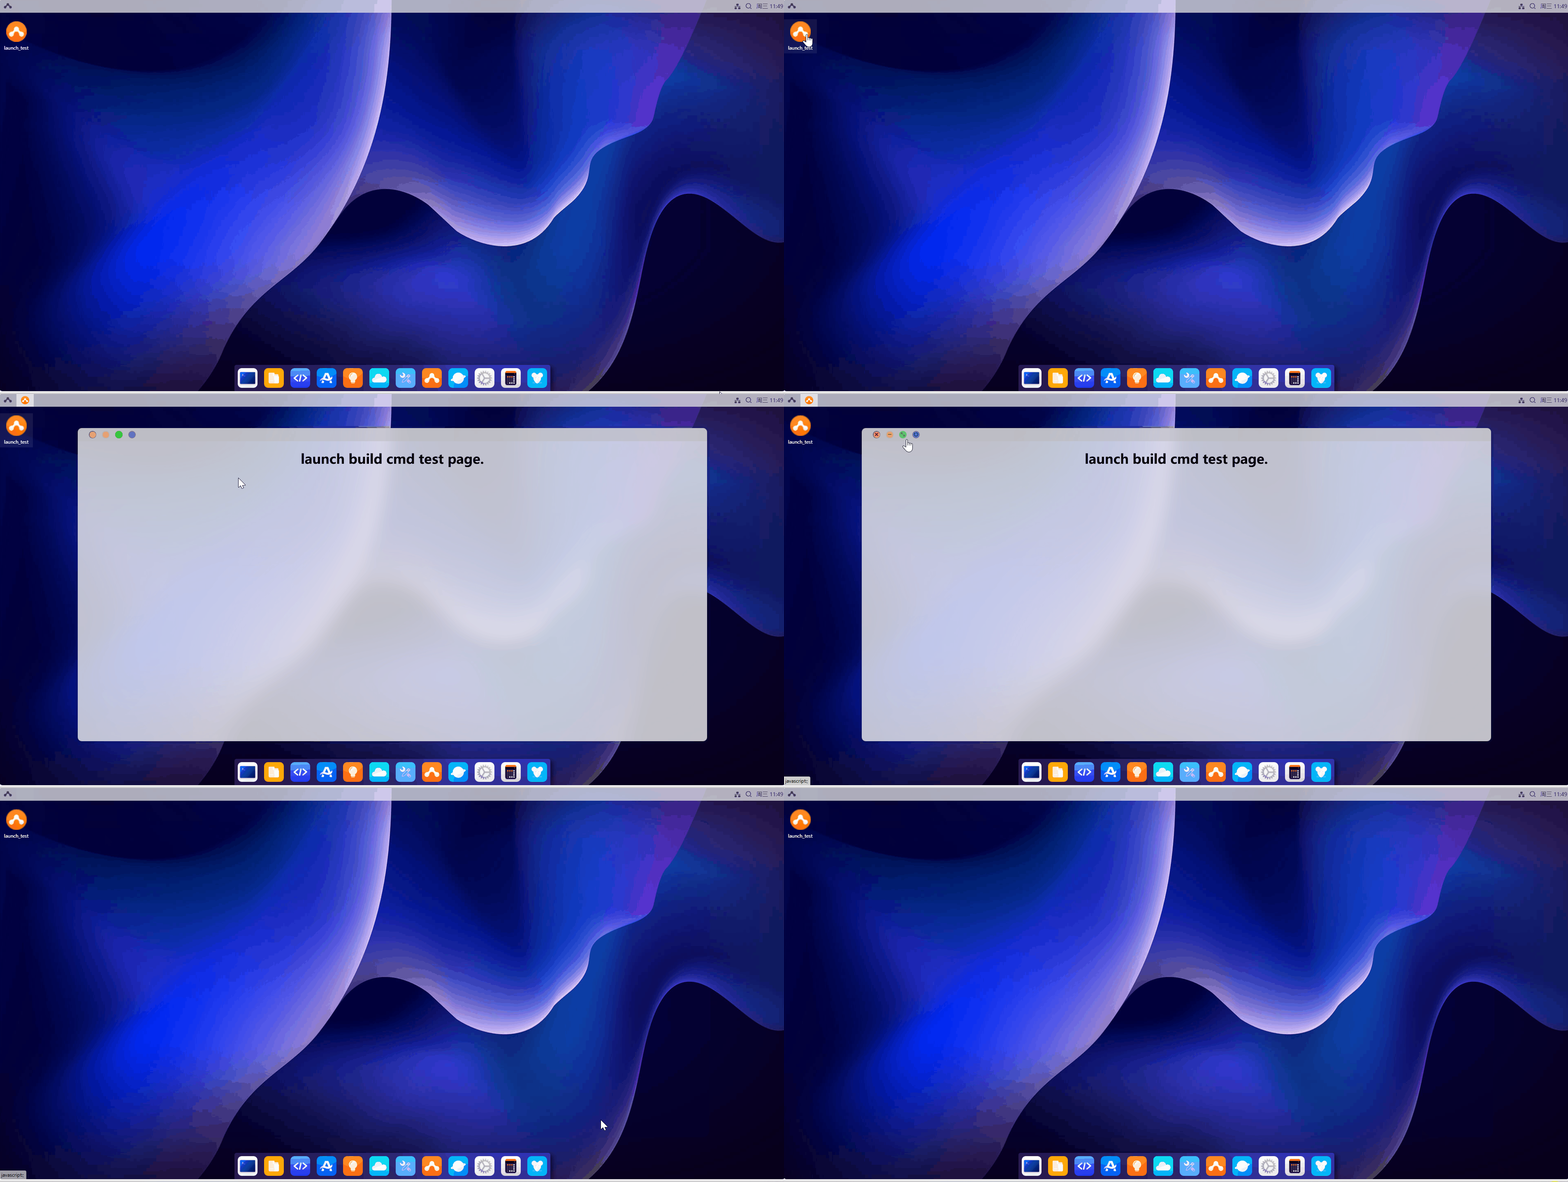
点击提交,找到添加的桌面图标点击打开。
启动服务时,界面会处于该loading状态,启动时间同在linux命令行下启动的时间,可能略有延迟。如果一直处于该界面,则说明启动失败。建议检查启动命令,以及设置的参数是否正确。
- 管理自定义添加的桌面图标
由于上传图标的有两种渠道,动态修改内容将会有一定麻烦,考虑到需要配置的内容较少,权衡之下,如需修 改,删除重新添加一个即可。 该功能可以方便的将自己想要快捷打开的内容放到桌面。
g)文件浏览器
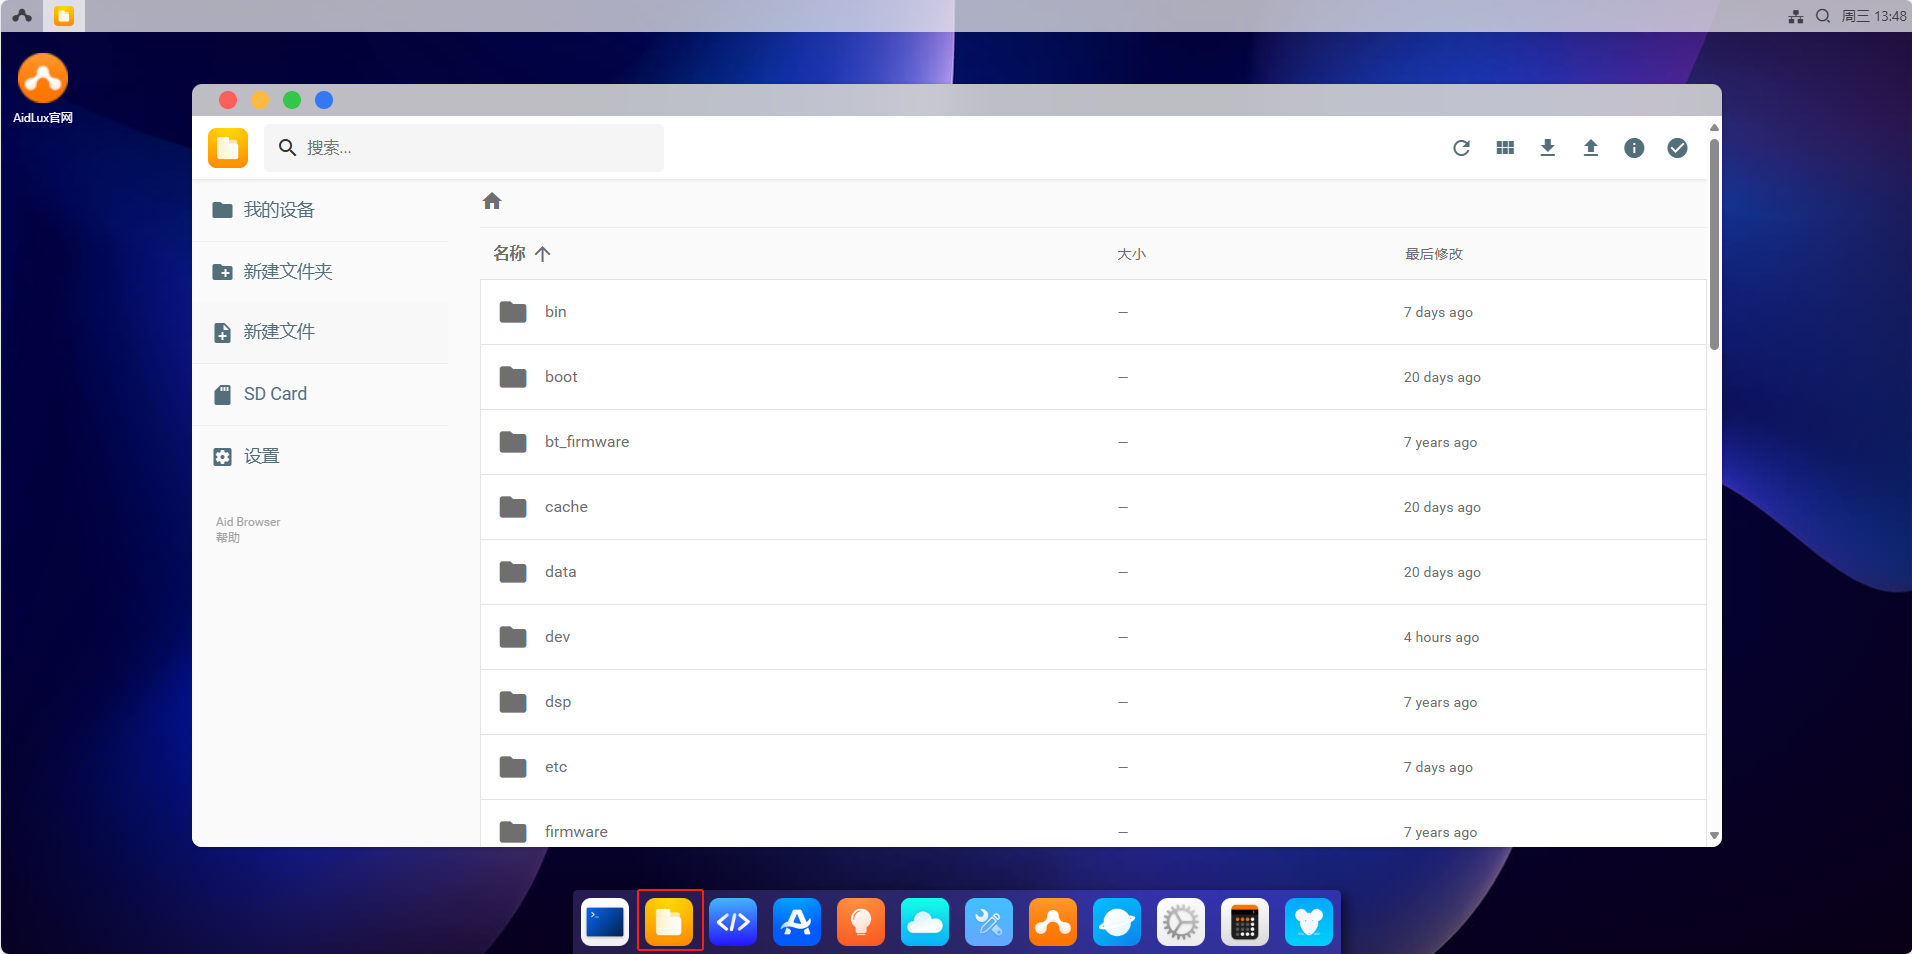
点击Aid桌面上的文件管理图标,可进入文件浏览器,左侧可看到AidLux的目录结构:
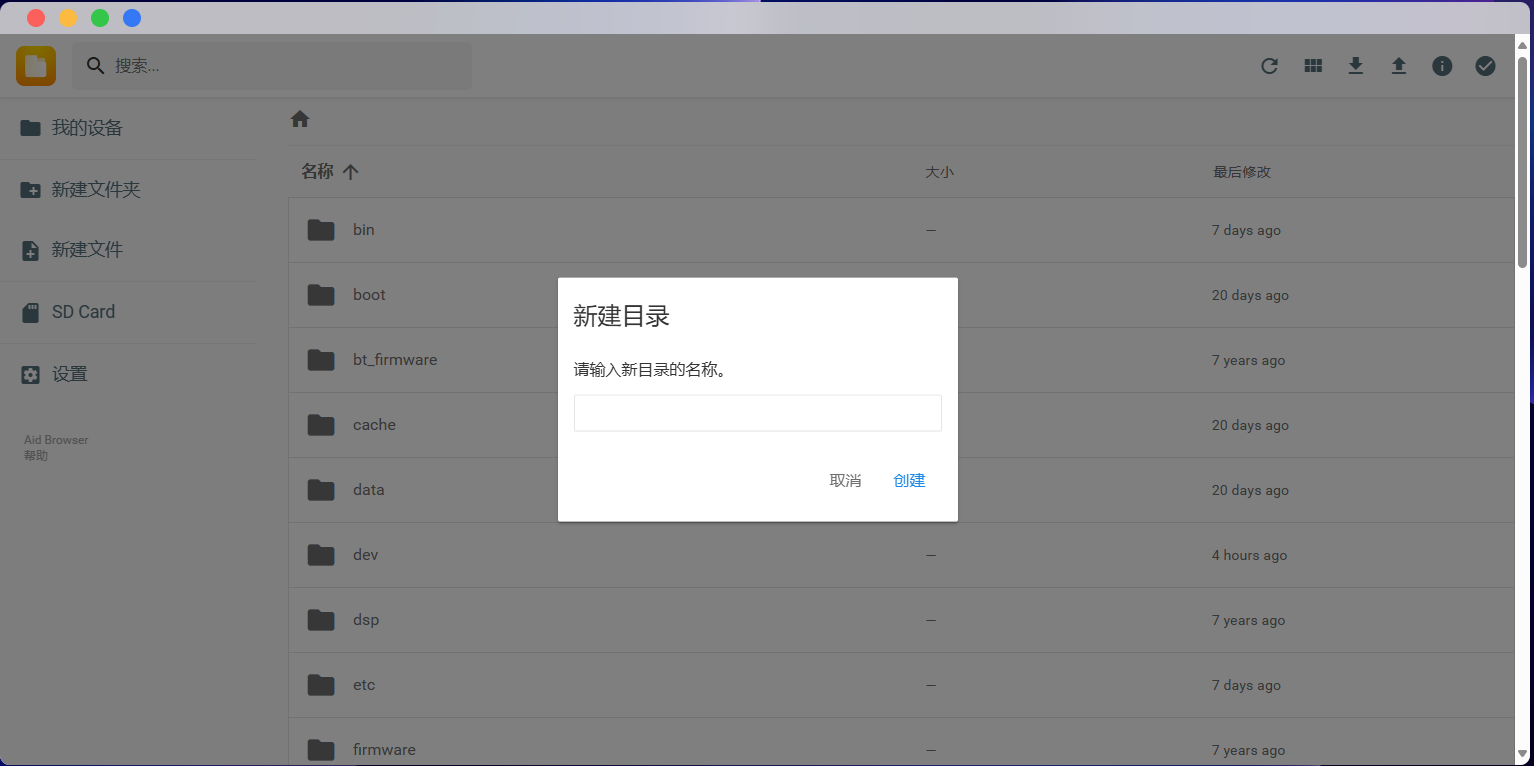
选择左侧的新建文件夹,输入名称可以新建一个文件夹:
选择左侧的New file,输入文件名可以新建一个文件:
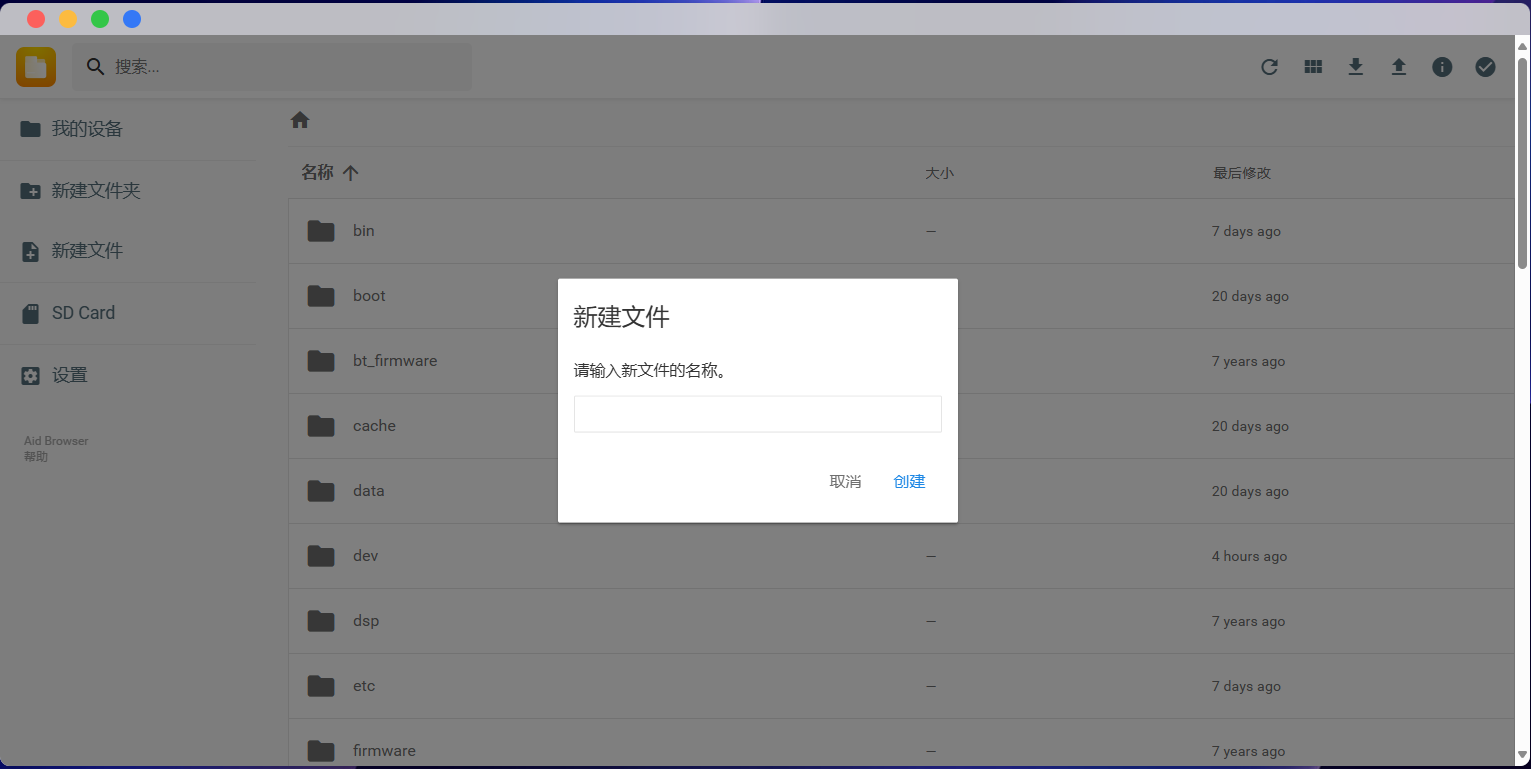
选择左侧的SD Card,可以快速跳转到设备存储目录:
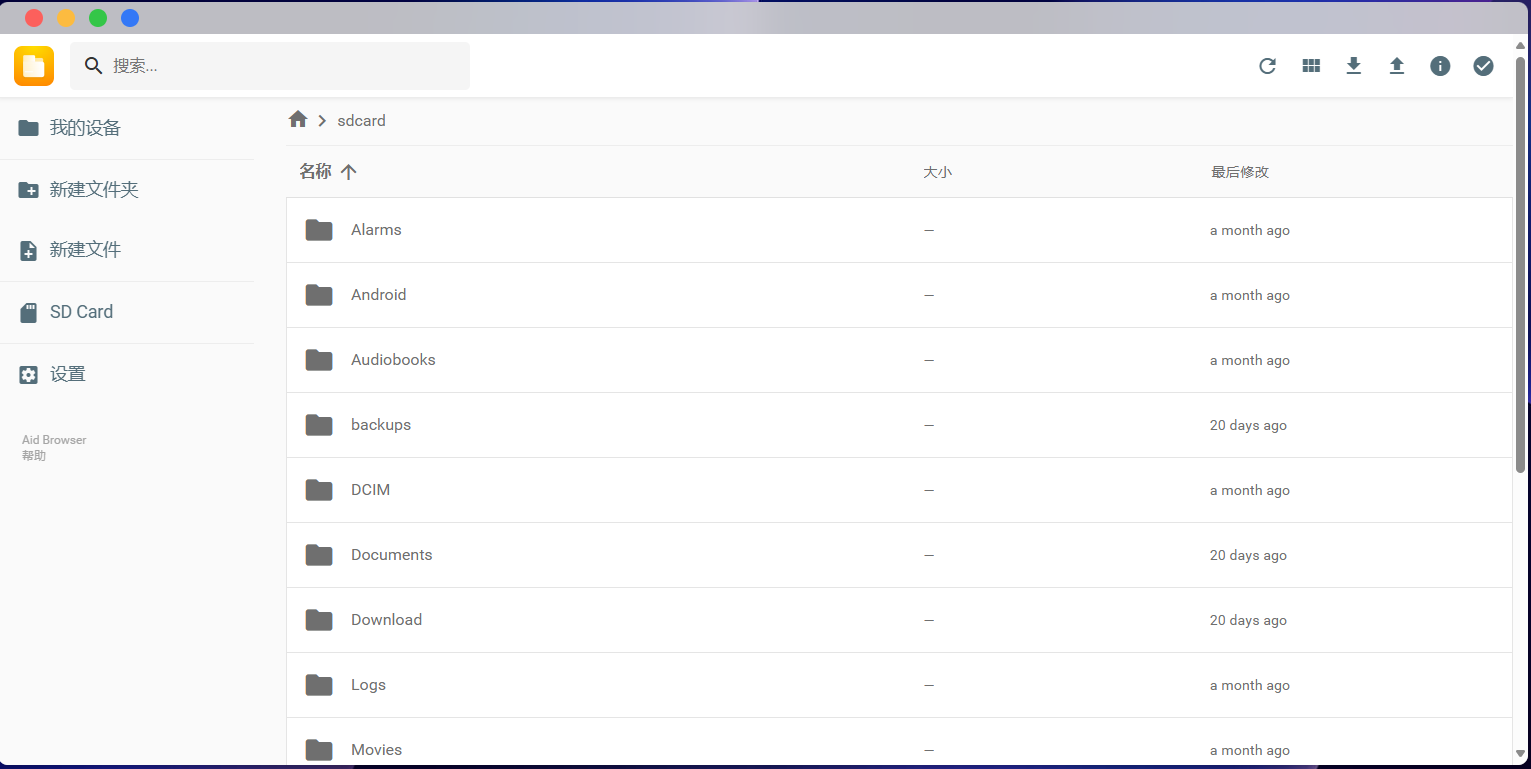
选择左侧的设置,可以进行相关设置:
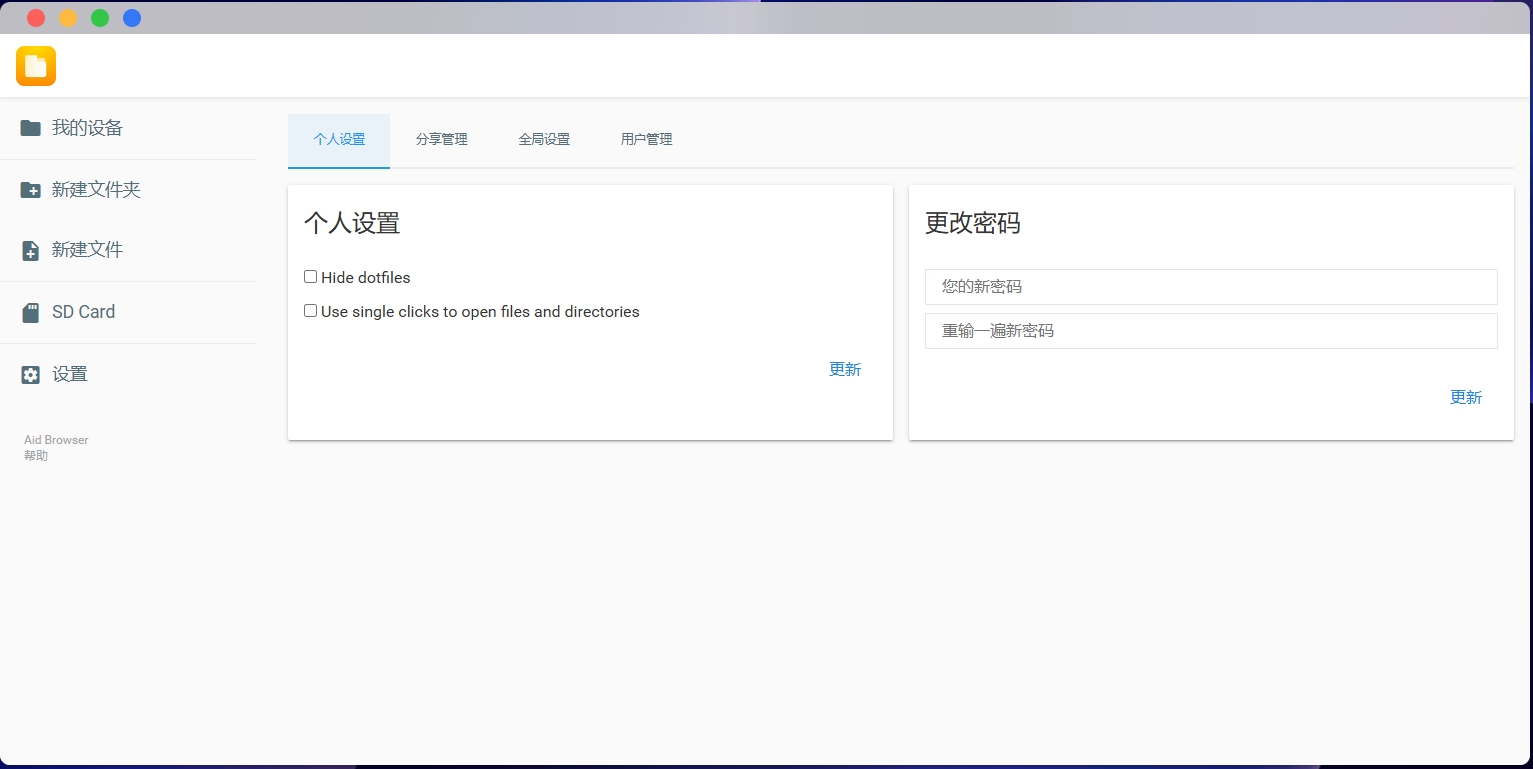
- 常用介绍:
AidLux中手机或arm板卡的SD卡的目录是sdcard
Home目录是案例
外接u盘的目录是media/sdi1
sdcard存放图片的目录是DCIM
- 上传和下载文件
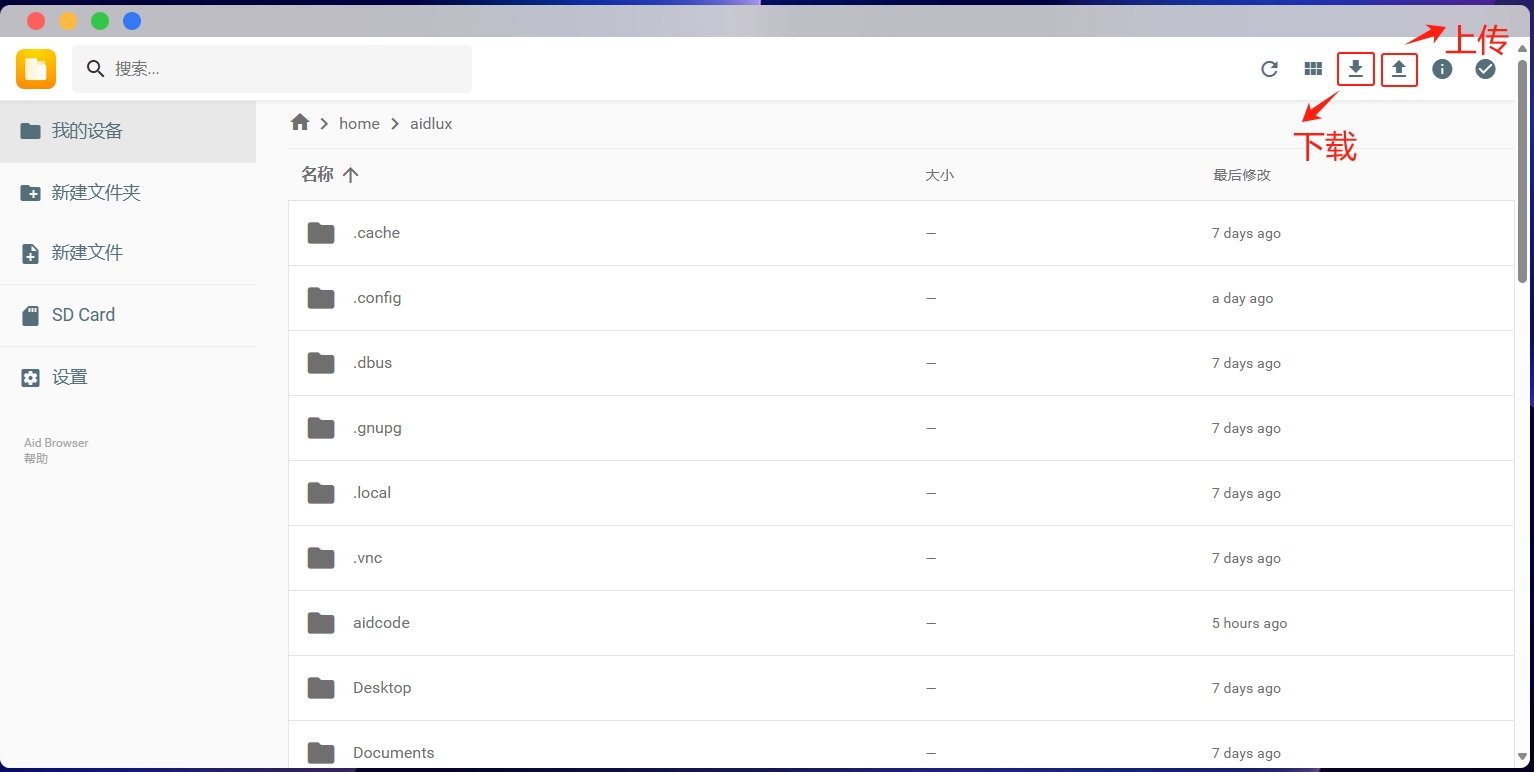
上传文件可在电脑端选择文件夹中的代码文件和图片,点击文件浏览器右上角的上传按钮,也可以直接拖拽到文件浏览器里面(如果文件过大,上方会出现上传的进度条,只有/home/aidlux有权限接受文件上传)。点击文件浏览器右上角的下载按钮是从移动端下载文件到电脑中。
AidLinux环境
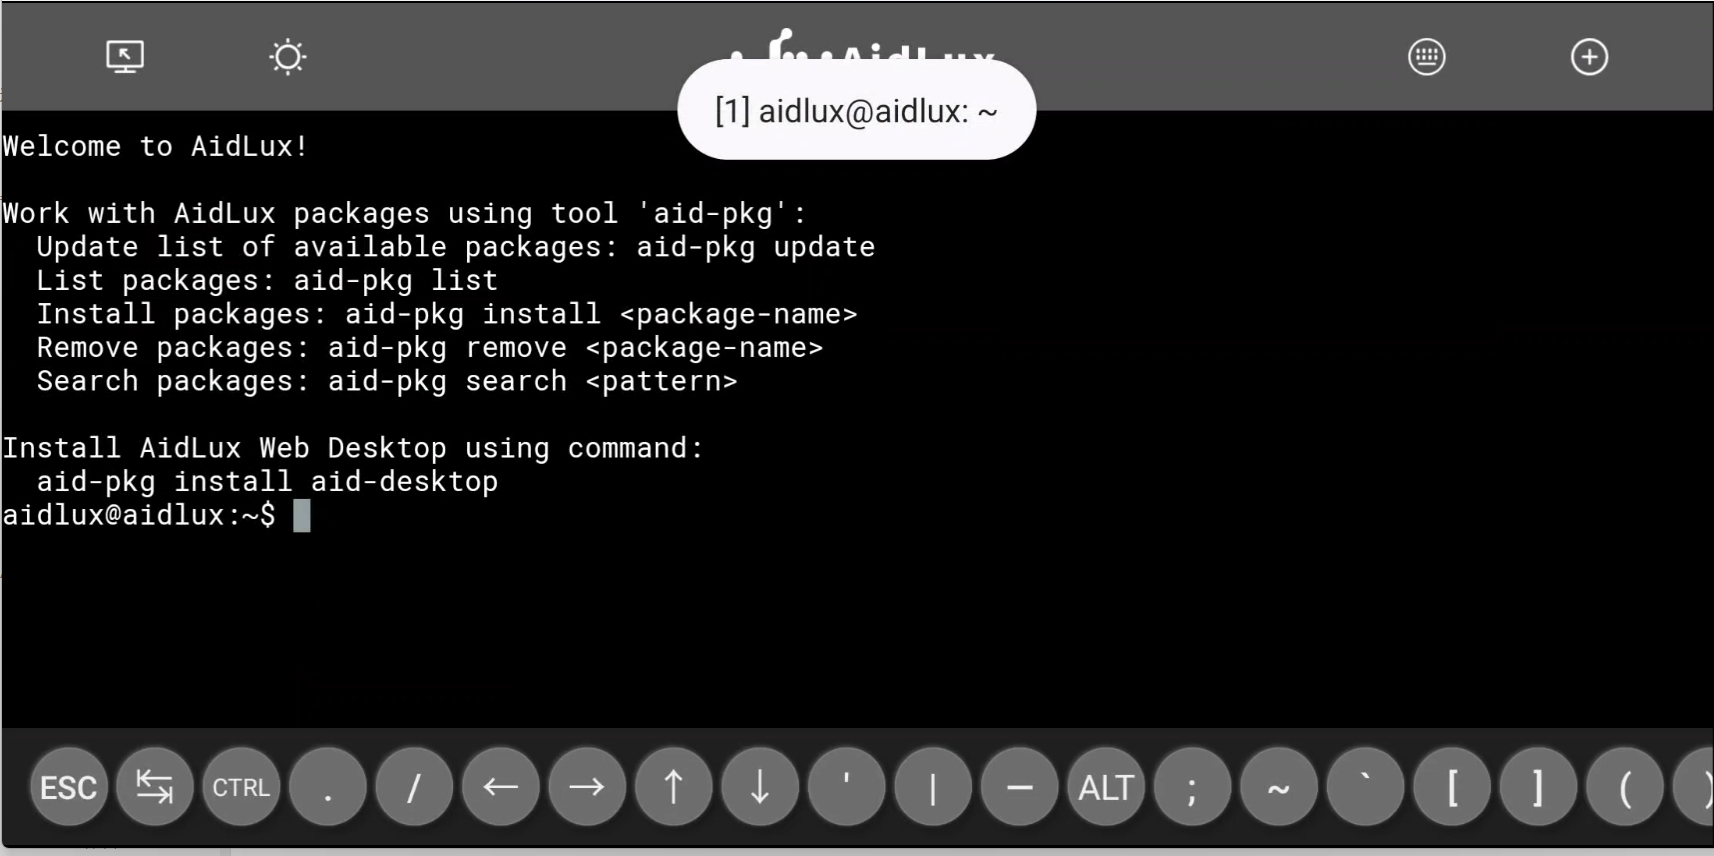
a) 进入命令行模式
AidLux 为用户提供了与原生 Linux 环境几乎相同的使用体验,对于需要使用原生 Linux 终端的用户来说,可以通过点击Aid桌面上的命令行模式图标进入终端模式(web桌面不可用):

b) 回到桌面模式
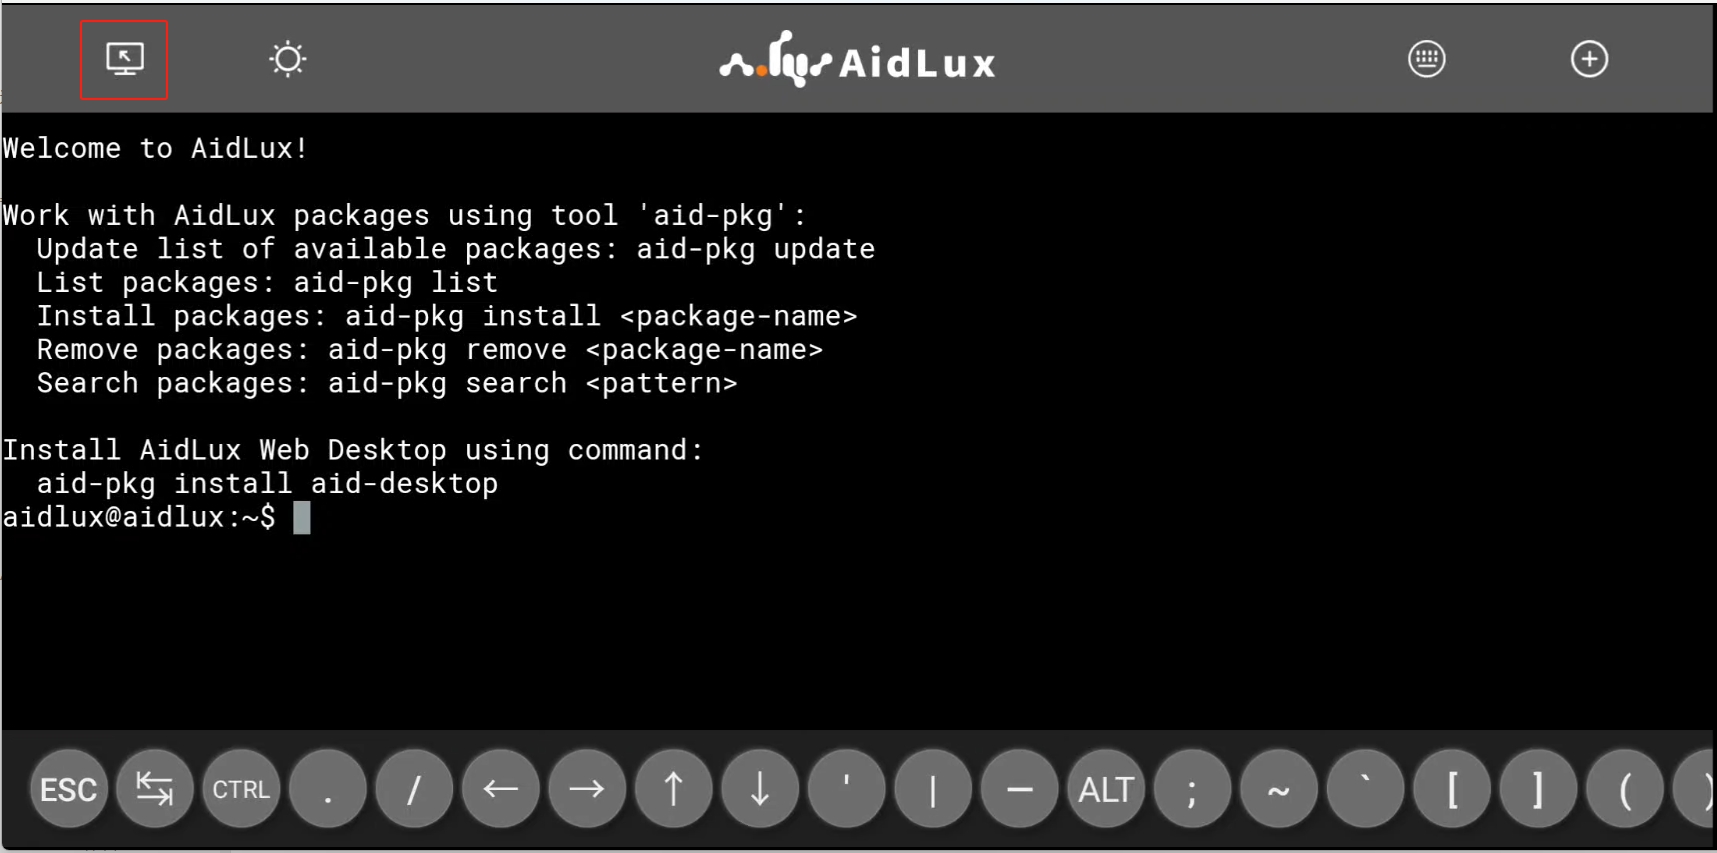
如果需要回到桌面模式,可以通过点击Aid终端左上角按钮实现:
c) touch bar
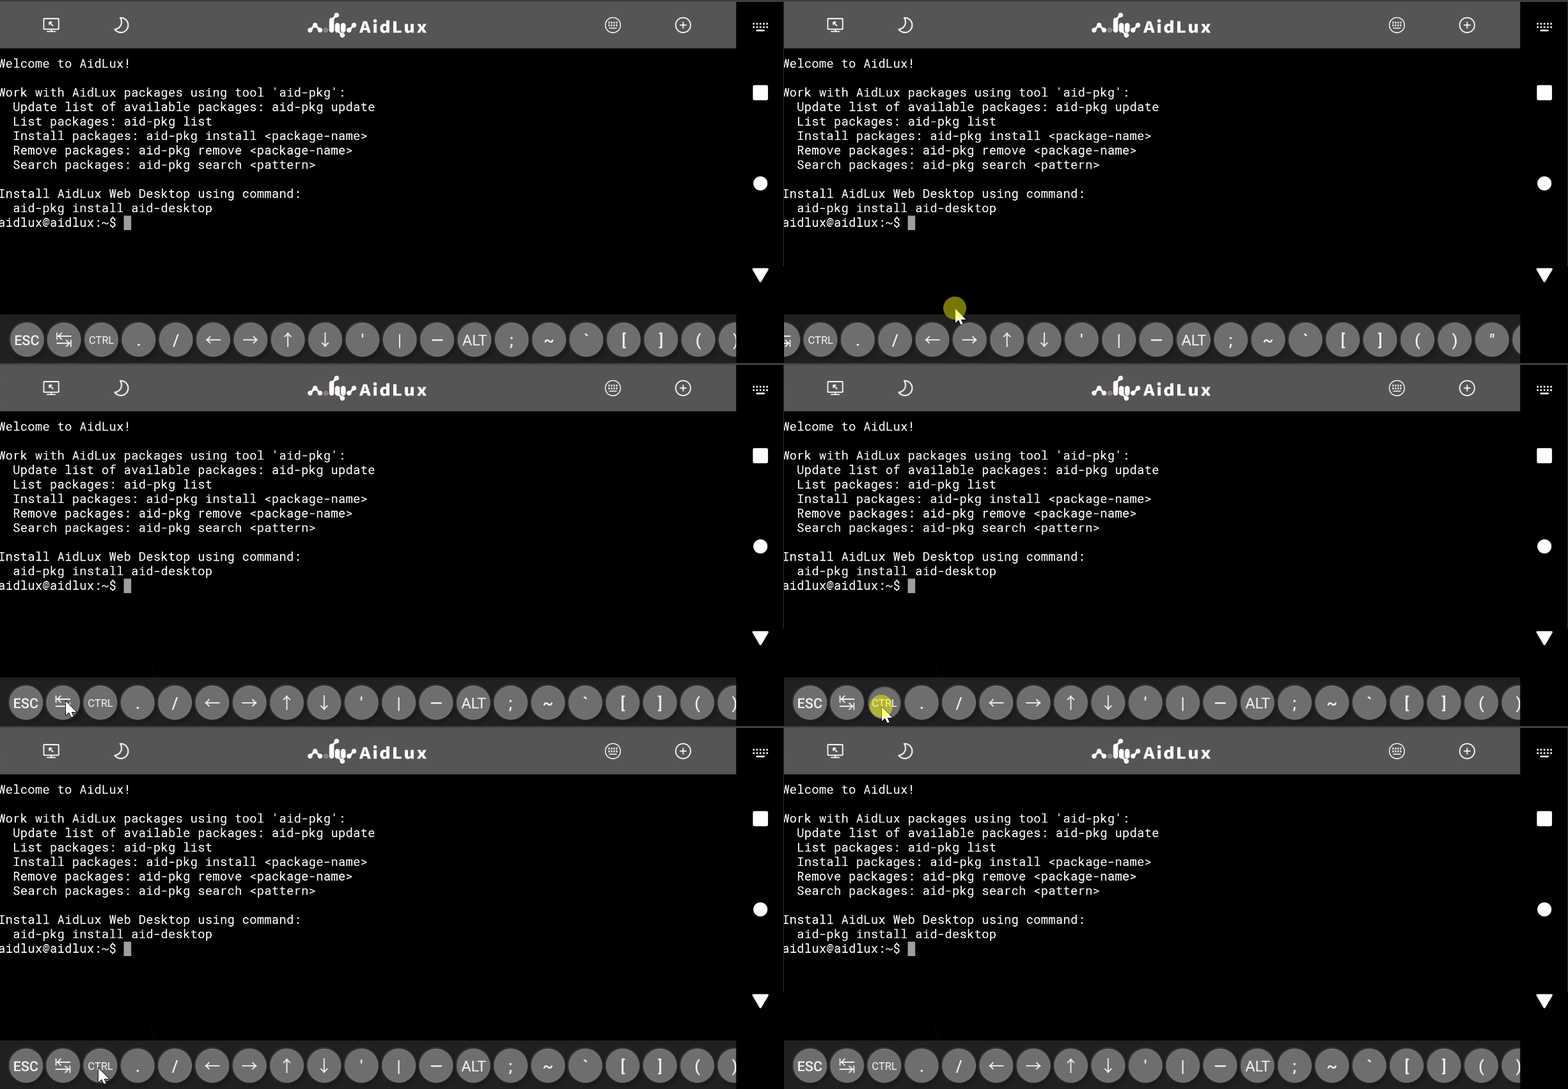
Aid终端底部的 Touch Bar 为用户提供了所有常用的功能按键,因为屏幕显示宽度有限,所以需要通过横向滑动的方式,查看整个 Touch Bar,Touch Bar 上的的功能键——比如 CTRL、ALT 等,按下时会有保持下陷的效果,用于实现组合键输入。
d) 切换touch bar主题
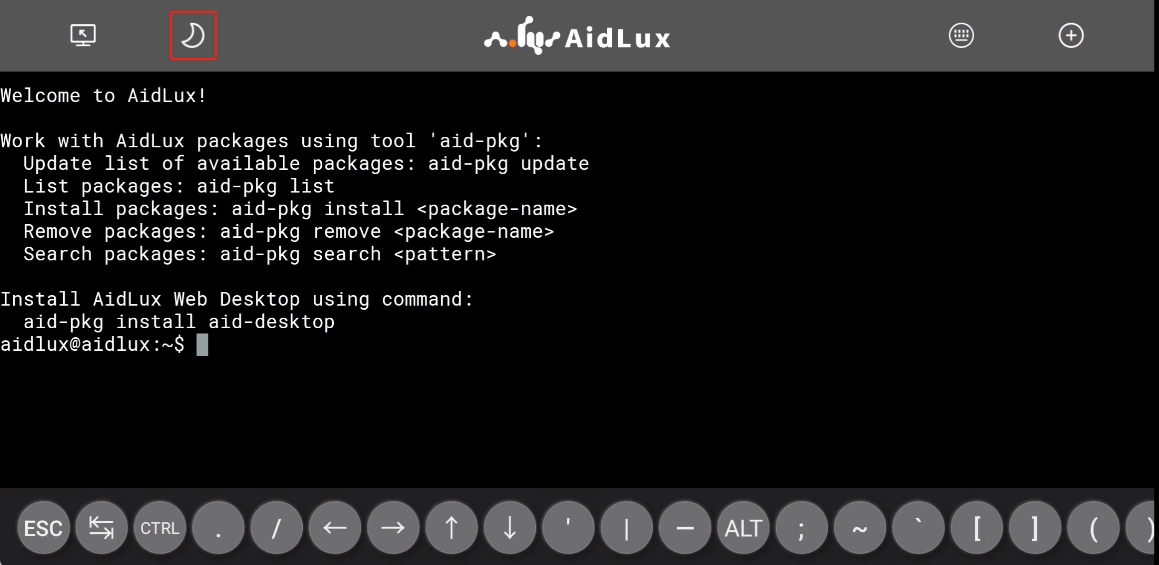
通过点击Aid终端左上角太阳形状的按钮,可以实现底部 Touch Bar 黑色/白色主题的切换:
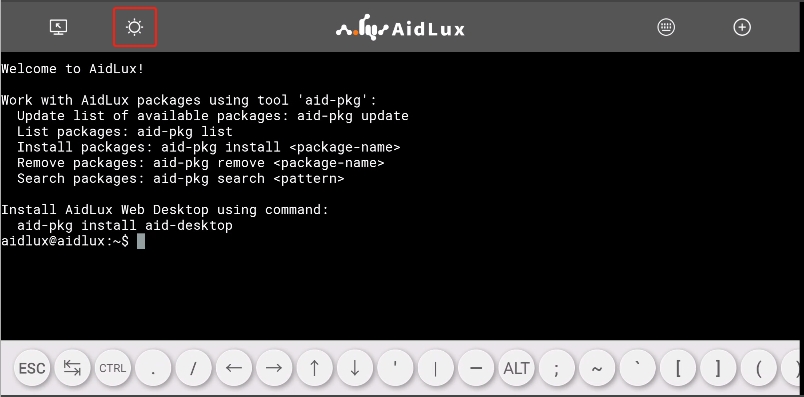
再次点击,底部的 Touch Bar 将切换成黑色主题:
e) 键盘
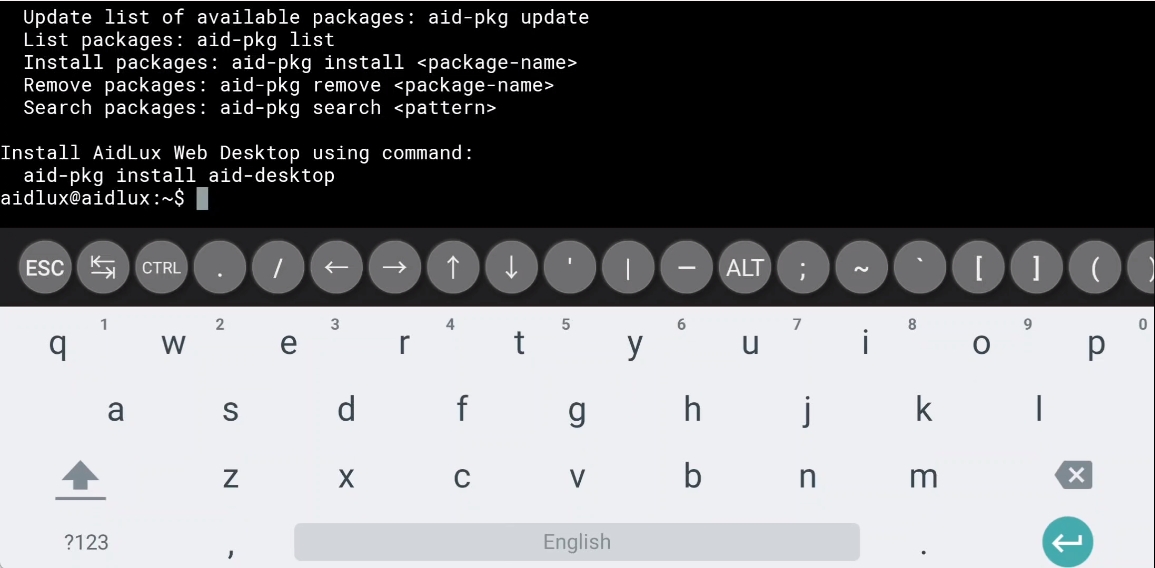
通过点击Aid终端的空白区域,可以呼出系统键盘:
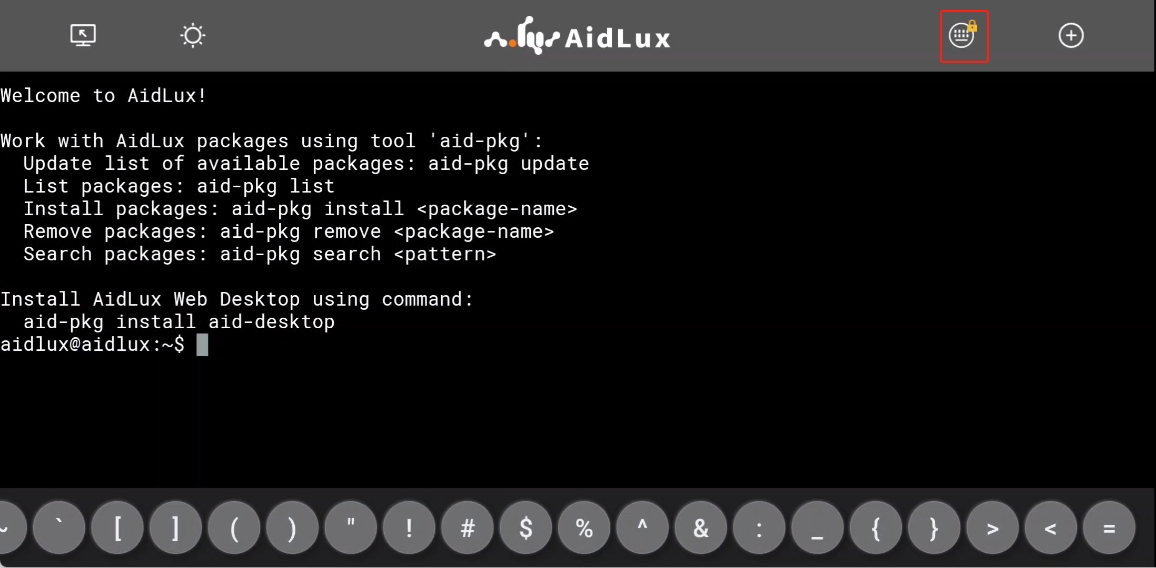
通过点击Aid终端右上角键盘形状的按钮切换系统自带键盘的隐藏锁定。切换后,按钮右上角将出现一个锁型标记:
f) 多终端
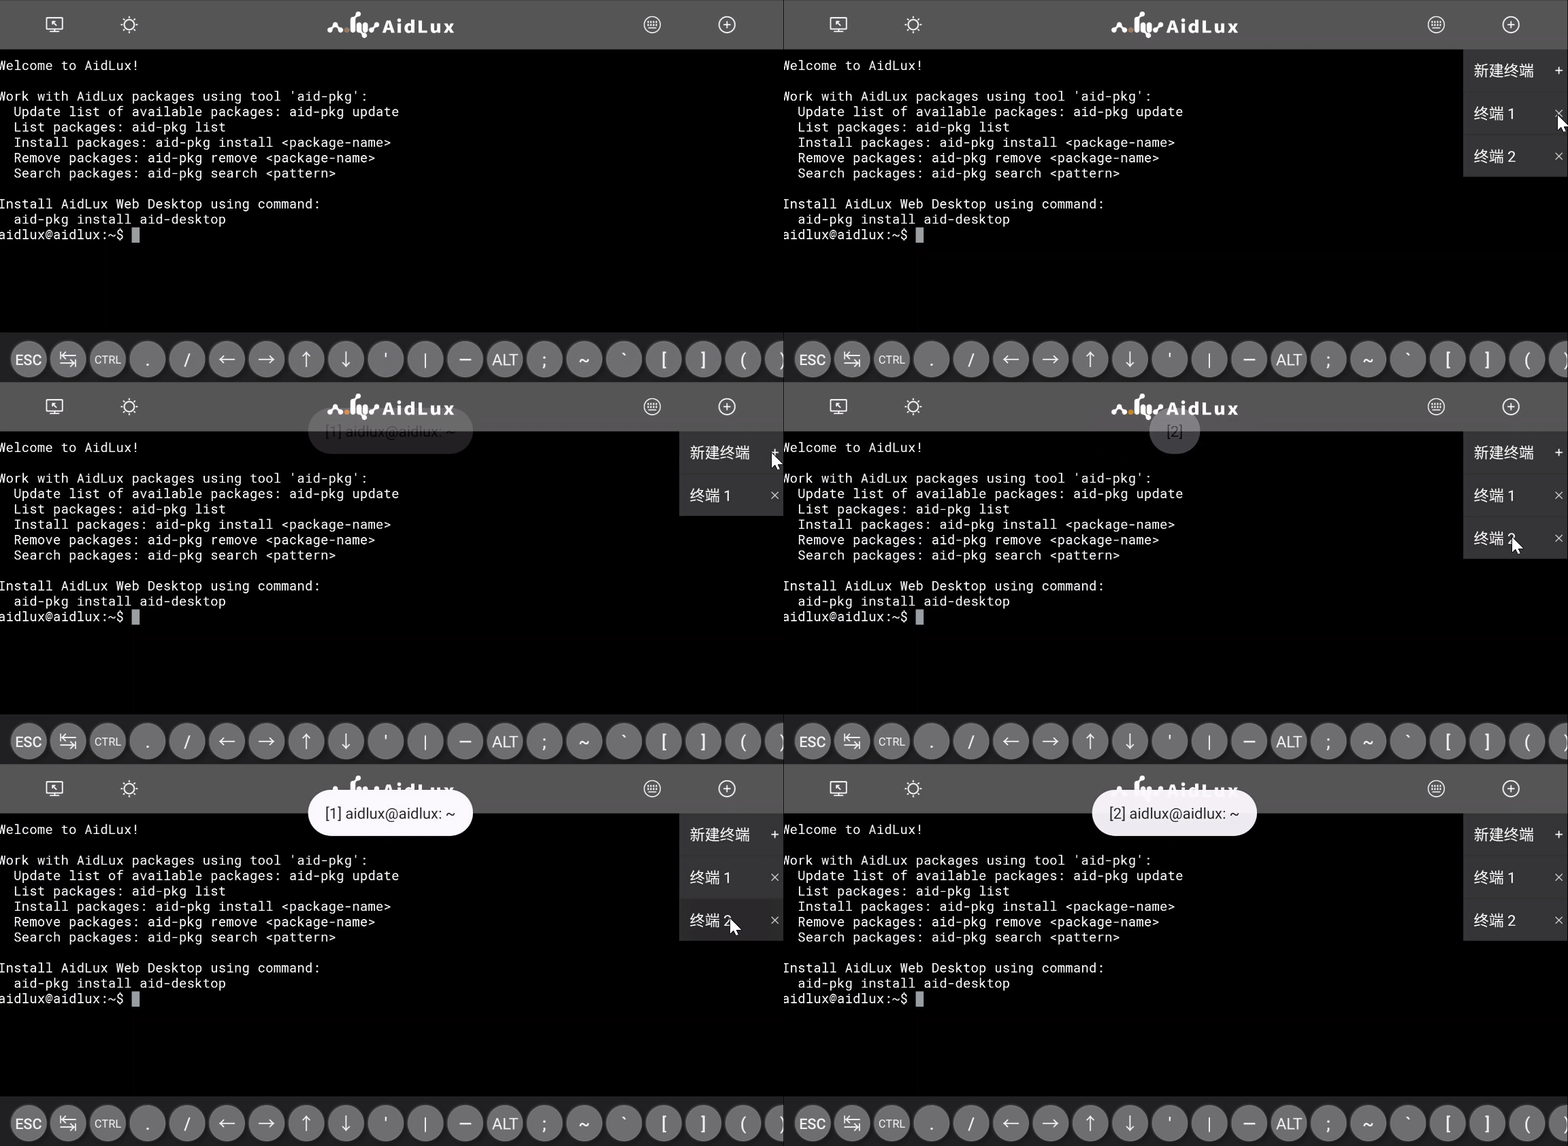
当需要运行多个前台任务时,单终端可能无法满足用户需求,可以通过点击Aid终端右上角加号按钮新建更多终端,在这里也可以切换多个终端,当使用完某一个终端需要关闭时,只需要点击Aid终端右上角加号按钮,再点击终端序号右侧的关闭按钮即可。
g) 执行命令
Aid终端提供了与原生 Linux 几乎完全相同的命令使用体验,这里以最常用的 ls 和 htop 命令进行演示:
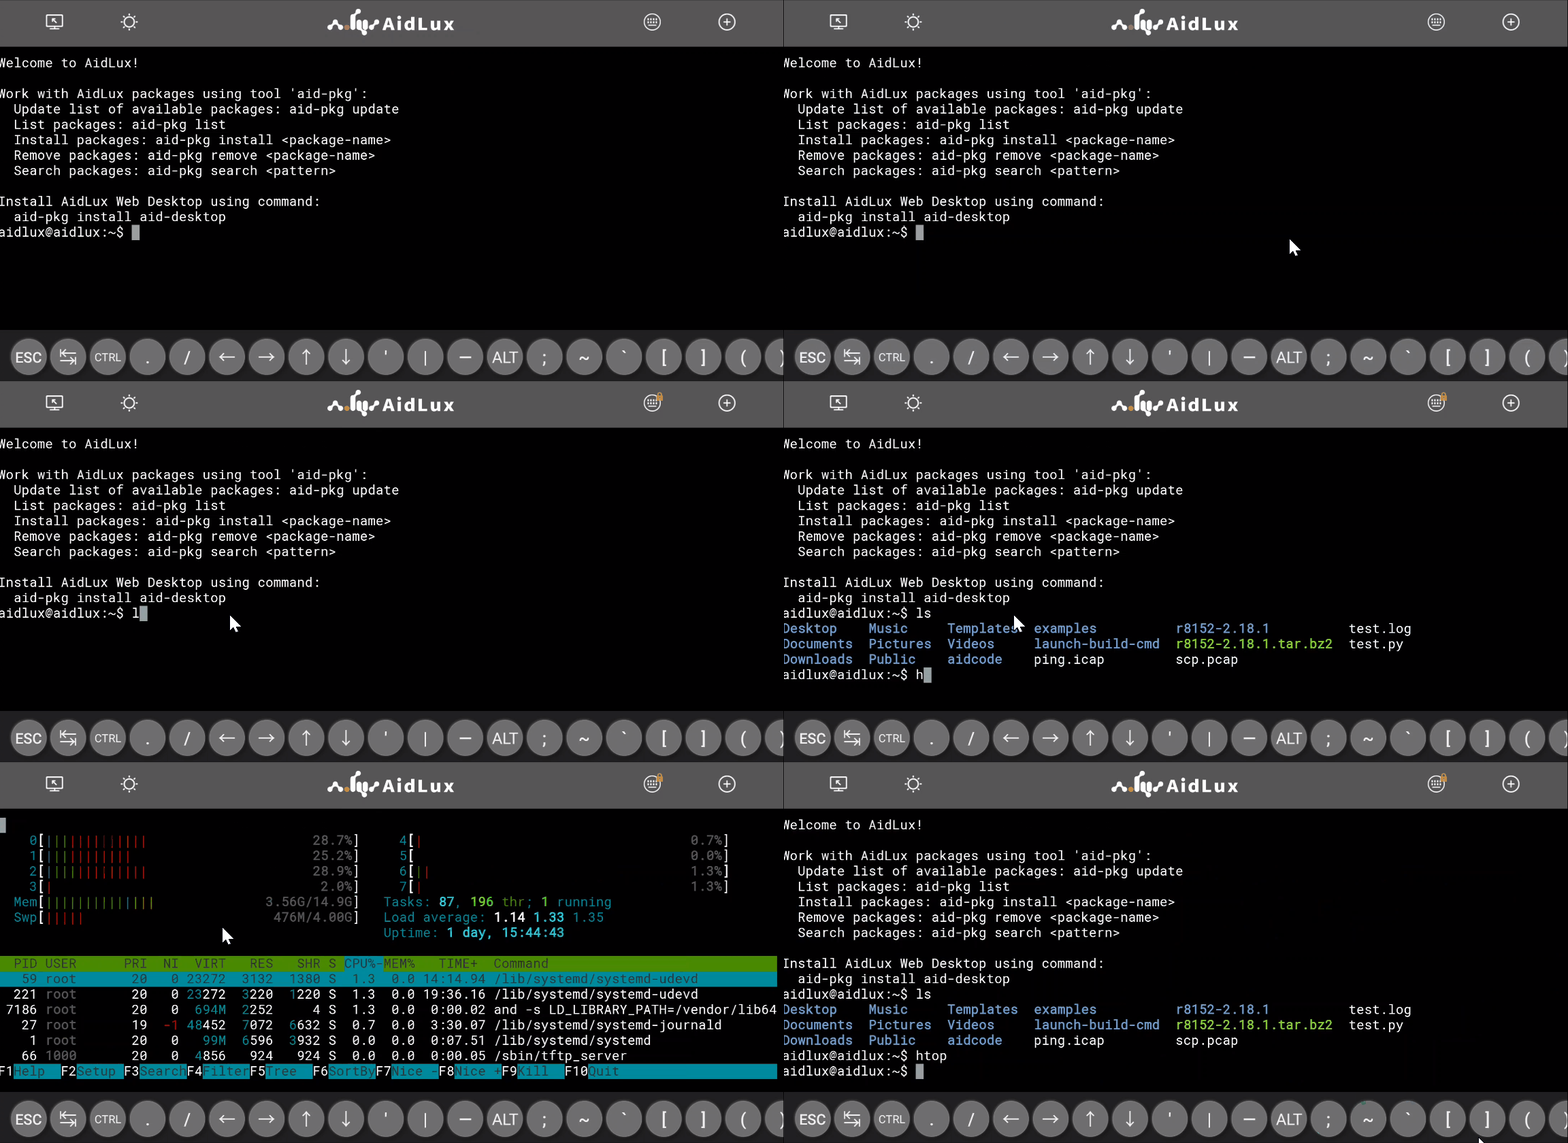
某些命令或者操作的输出可能会出现单行太长导致自动折行的情况,可以通过解除手机的屏幕旋转锁定,然后将手机横向放置来解决这个问题。但是如果在横屏模式下依然超长,那么还是会出现自动折行的情况。
对于输出内容过多导致自动翻页的情况,可以通过滑动屏幕来实现上下翻页阅读。
Linux原生桌面环境
a) 安装
可在应用中心进行Xfce4安装

b) 简介
Xfce是一个自由软件,运行在类Unix操作系统 (如Linux、FreeBSD 和 Solaris)上,提供快速、轻量、美观和友好的桌面环境。
Xfce由独立的软件组件构成,可根据需要单独使用或者组合在一起提供计算机图形桌面环境的全面功能。
Xfce由C语言写成,依赖GTK+。
c) 使用
在安装操作结束后,进入Xfce后提醒输入Password,输入aidlux即可,使用VNC连接到xfce桌面环境。
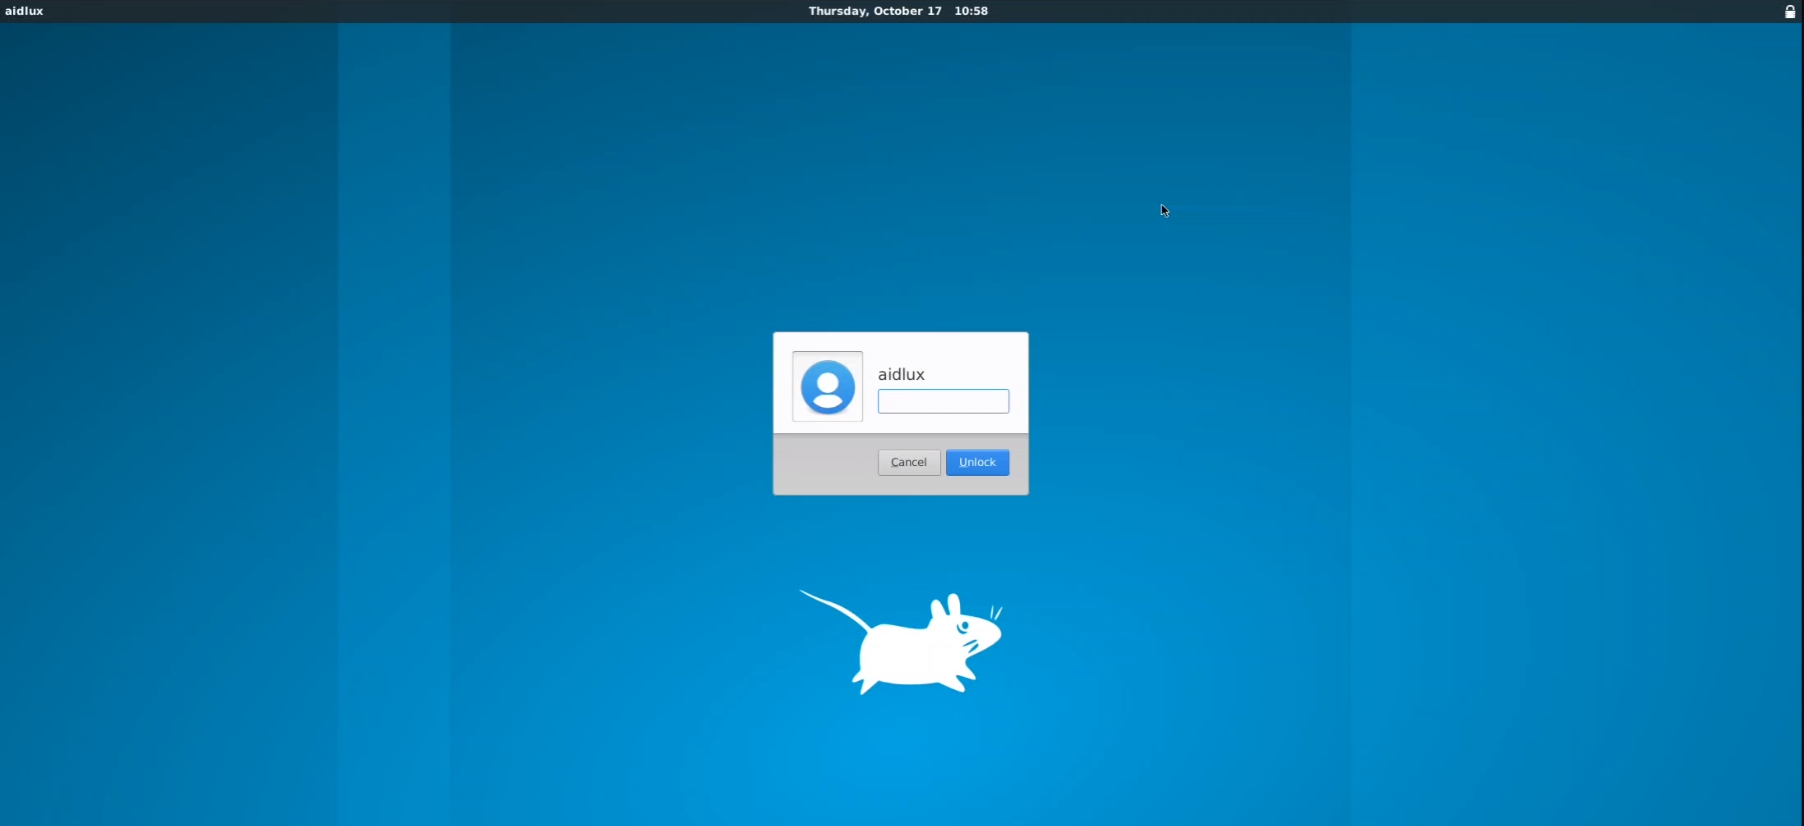
在这个环境下可以像使用普通的 Ubuntu一样安装一些带图形界面的工具进行使用。这里以安装 Emacs 和 Pycharm-Community 作为示例进行讲解。
d) EMACS
打开Xfce4终端,输入:
apt install -y emacs
安装Emacs,如提示权限不足,切换为root用户安装,等待安装完成后,直接输入命令emacs敲击回车,启动Emacs。
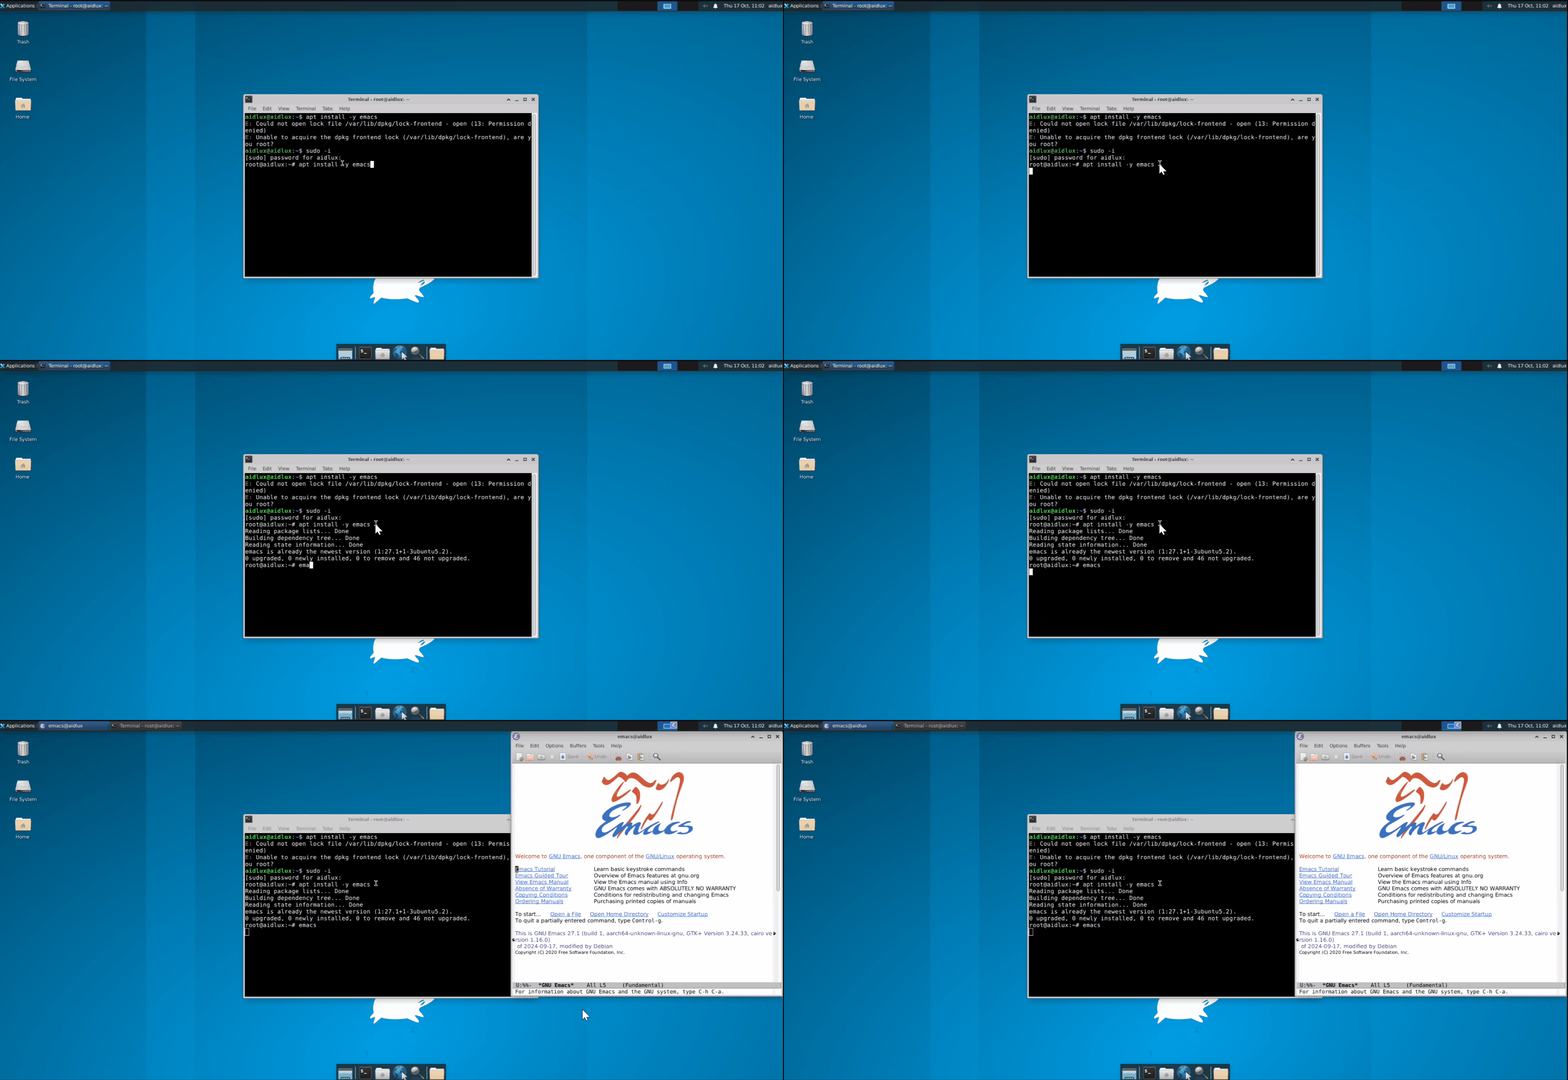
如果要退出Emacs,可以直接关闭窗口,或者在终端使用快捷键Ctrl+C。
e) Pycharm-community
使用pycharm-community-2024.1.6(点此进入 pycharm-community 官网下载列表页,如果无法正常打开网页,请尝试清理缓存或打开全局网络代理),下载完成后讲压缩包拷贝到home/aidlux目录下使用如下指令解压:
tar vxf pycharm-community-2024.1.6.tar.gz
进入pycharm-community解压后的bin目录:
cd ./pycharm-community-2024.1.6/bin
运行启动脚本:
./pycharm.sh
稍作等待,看到pycharm-community窗口出现表示成功:
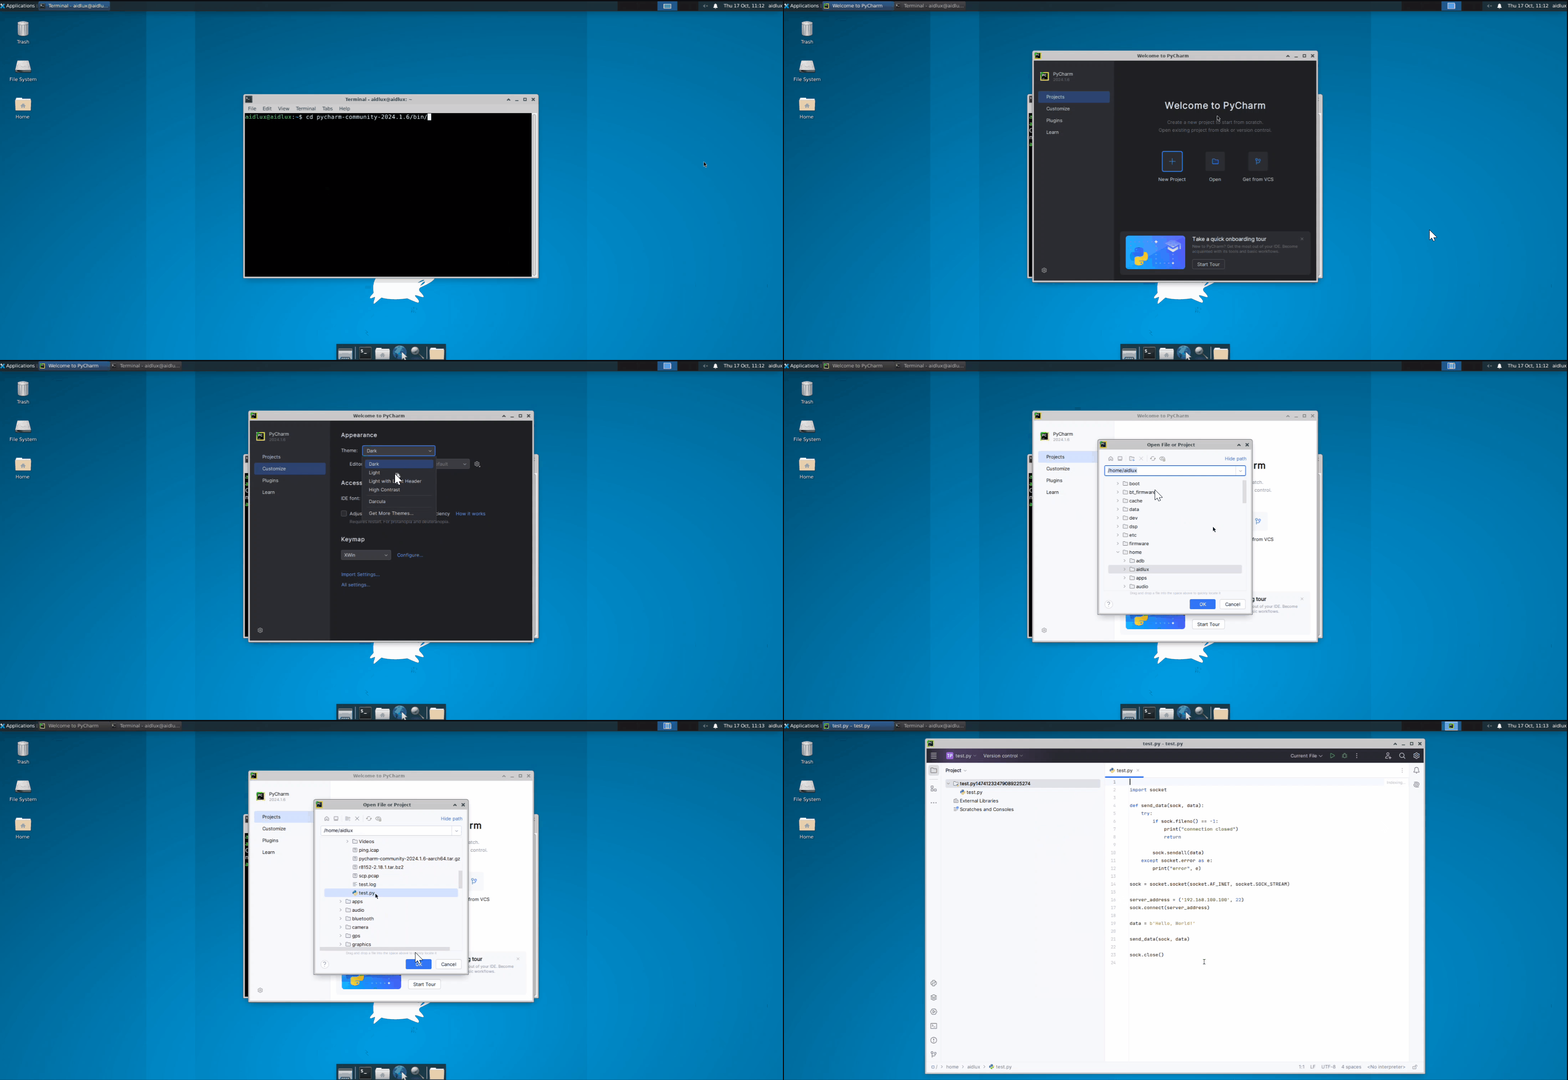
Android和AidLux桌面环境切换
首先在设置中检查是否将AidLux设置为主屏幕应用(如需要AidLux开机自启动则打开该设置,否则关闭该设置),取消设置后即可灵活在Android和AidLux桌面环境中进行切换,演示如下:

Aidlux平台开发
AI应用运行环境
AidLite编程接口
- cv2模块是OpenCV 2.0的简写,在计算机视觉项目的开发中,OpenCV作为较大众的开源库,拥有了丰富的常用图像处理函数库,采用C/C++语言编写,可以运行在#Linux/Windows/Mac等操作系统上,能够快速的实现
- NumPy(Numerical Python) 是 Python 语言的一个扩展程序库,支持大量的维度数组与矩阵运算,此外也针对数组运算提供大量的数学函数库。在机器学习算法中大#部分都是调用Numpy库来完成基础数值计算的。
- AI加速模块aidlite由AidLux提供,支持多种硬件加速器(basic版本不支持dsp加速)。
- AidLite SDK文档请查看:AidLite SDK | AidLux Docs
AI智能加速
1.简介
AidLux提供CPU和GPU两种加速模式,内置aidlite模块,能够充分释放设备GPU性能。
GPU以大量的线程实现面向高吞吐量的数据并行计算,十分适用于包含大量运算符的神经网络:一些输入张量可以轻易划分为更小的GPU工作负载,并且可以同时执行,进一步降低延迟。
AidLux提供的GPU加速模块aidlite,支持多种硬件加速器。理想情况下,能让GPU以前所未有的速度进行实时推理运算,这在以往的解决方案中是无法想象的!
2.使用
#导入加速包
import aidlite
# 创建Model实例对象,并设置模型相关参数
model = aidlite.Model.create_instance(model_path)
if model is None:
    print("Create model failed !")
    return False
input_shapes = [[1,320,320,3]]
output_shapes = [[1,10,10,255],[1,20,20,255],[1,40,40,255]]
model.set_model_properties(input_shapes, aidlite.DataType.TYPE_FLOAT32, output_shapes, aidlite.DataType.TYPE_FLOAT32)
# 创建Config实例对象,并设置配置信息
config = aidlite.Config.create_instance()
if config is None:
 print("build_interpretper_from_model_and_config failed !")
 return False
config.framework_type = aidlite.FrameworkType.TYPE_SNPE
config.accelerate_type = aidlite.AccelerateType.TYPE_GPU
config.is_quantify_model = 1
config.SNPE_out_names = ["InceptionV3/Predictions/Softmax"]
3.头发检测AI模型GPU加速案例
import time
from time import sleep
import subprocess
import remi
import sys
import numpy as np
import aidlite
import os
import aidcv as cv2

def get_cap_id():
    try:
        # 构造命令,使用awk处理输出
        cmd = "ls -l /sys/class/video4linux | awk -F ' -> ' '/usb/{sub(/.*video/, \"\", $2); print $2}'"
        result = subprocess.run(cmd, shell=True, capture_output=True, text=True)
        output = result.stdout.strip().split()

        # 转换所有捕获的编号为整数,找出最小值
        video_numbers = list(map(int, output))
        if video_numbers:
            return min(video_numbers)
        else:
            return None
    except Exception as e:
        print(f"An error occurred: {e}")
        return None

def transfer(image, mask):
    mask = cv2.resize(mask, (image.shape[1], image.shape[0]))
    mask_n = np.zeros_like(image)
    mask_n[:, :, 0] = mask

    alpha = 0.7
    beta = (1.0 - alpha)
    dst = cv2.addWeighted(image, alpha, mask_n, beta, 0.0)
    return dst


w = 256
h = 256

inShape = [[1 , w , h , 3]]
outShape = [[1 , w , h], [1,w , h]]
model_path="models/segmentation.tnnmodel"

model = aidlite.Model.create_instance(model_path)
if model is None:
    print("Create model failed !")

model.set_model_properties(inShape, aidlite.DataType.TYPE_UINT8, outShape,aidlite.DataType.TYPE_FLOAT32)

config = aidlite.Config.create_instance()
config.accelerate_type = aidlite.AccelerateType.TYPE_GPU


fast_interpreter = aidlite.InterpreterBuilder.build_interpretper_from_model_and_config(model, config)
if fast_interpreter is None:
    print("build_interpretper_from_model_and_config failed !")
result = fast_interpreter.init()
if result != 0:
    print("interpreter init failed !")
result = fast_interpreter.load_model()
if result != 0:
    print("interpreter load model failed !")
print("model load success!")

aidlux_type="root"
# 0-后置,1-前置
camId = 1
opened = False
while not opened:
    if aidlux_type == "basic":
        cap=cv2.VideoCapture(camId, device='mipi')
    else:
        capId = get_cap_id()
        print("usb camera id: ", capId)
        if capId is None:
            print ("no found usb camera")
            # 默认用1-前置摄像头打开相机,若打开失败,请尝试修改为0-后置
            cap=cv2.VideoCapture(1, device='mipi')
        else:
            camId = capId
            cap = cv2.VideoCapture(camId)
            cap.set(6, cv2.VideoWriter.fourcc('M','J','P','G'))
    if cap.isOpened():
        opened = True
    else:
        print("open camera failed")
        cap.release()
        time.sleep(0.5)

while True:

    ret,frame = cap.read()
    if not ret:
        continue
    if frame is None:
        continue
    if camId == 1:
        frame = cv2.flip(frame, 1)
    t0 = time.time()
    img = cv2.resize(frame, (w, w))
    img = cv2.cvtColor(img, cv2.COLOR_BGR2RGB)
    t1 = time.time()
    print('tnn: start set')
    # print("img.data================ \n", img)
    result = fast_interpreter.set_input_tensor(0, img.data)
    print(result)
    if result != 0:
        print("interpreter set_input_tensor() failed")
    t2 = time.time()
    print('tnn: start invoke')
    result = fast_interpreter.invoke()
    if result != 0:
        print("interpreter invoke() failed")

    t3 = time.time()
    pred_1 = fast_interpreter.get_output_tensor(1)
    if pred_1 is None:
        print("sample : interpreter->get_output_tensor(1) failed !")

    pred_0 = fast_interpreter.get_output_tensor(0)
    if pred_0 is None:
        print("sample : interpreter->get_output_tensor(0) failed !")

    print('pred:', pred_0.shape, pred_1.shape)
    t4 = time.time()

    pred0 = (pred_0).reshape(w, h)
    pred1 = (pred_1).reshape(w, h)


    back = ((pred0)).copy()
    front = ((pred1)).copy()
    t5 = time.time()
    mask = front - back
    print('mask:',mask)

    mask[mask > 0] = 255
    mask[mask < 0] = 0

    dst = transfer(frame, mask)
    print('preProcess:%f===setInpu:%f===invoke:%f===getOutput:%f===postProcess:%f' % (
    t1 - t0, t2 - t1, t3 - t2, t4 - t3, t5 - t4))
    print('tot', t5 - t0)
    cv2.imshow("",dst)
更多参考可查看examples中的案例
4.GPU加速与CPU加速运行AI示例的速度对比
AI模型在GPU上和在CPU上运行的速度对比如图所示:
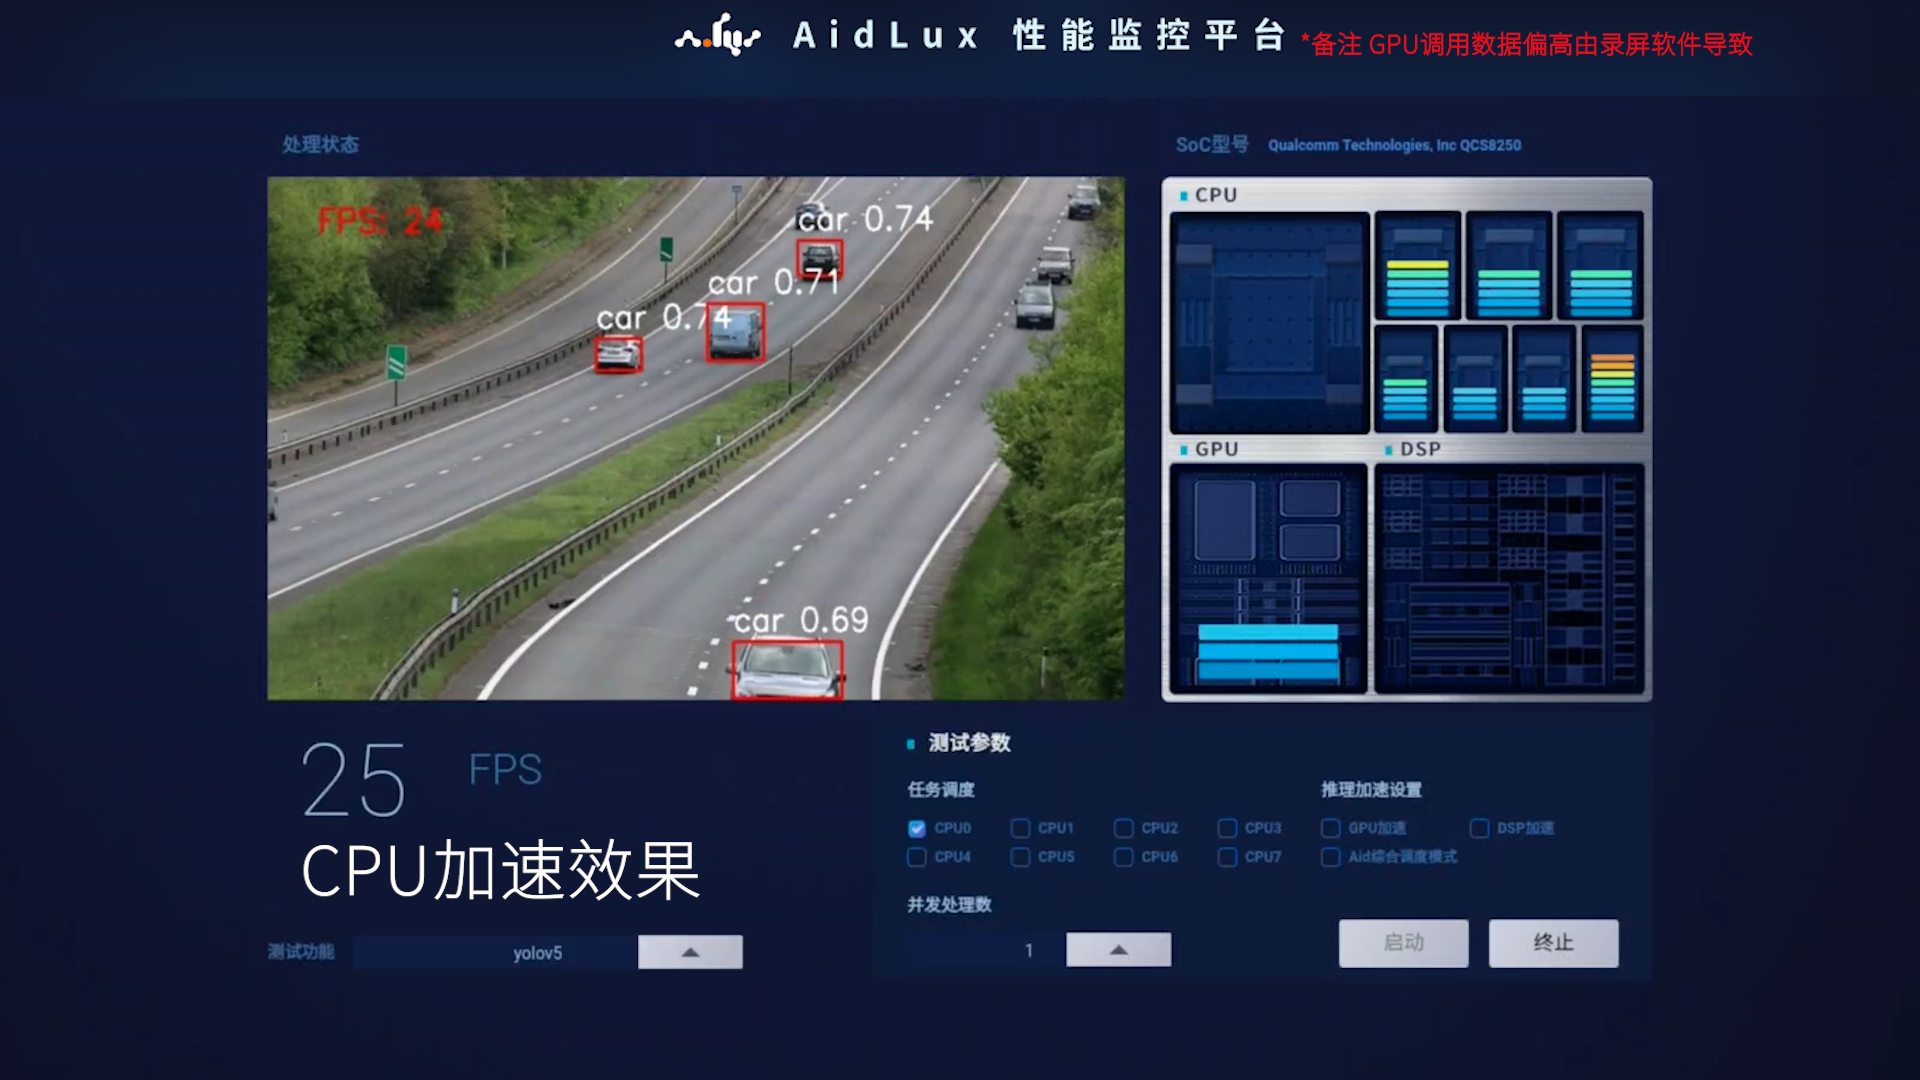
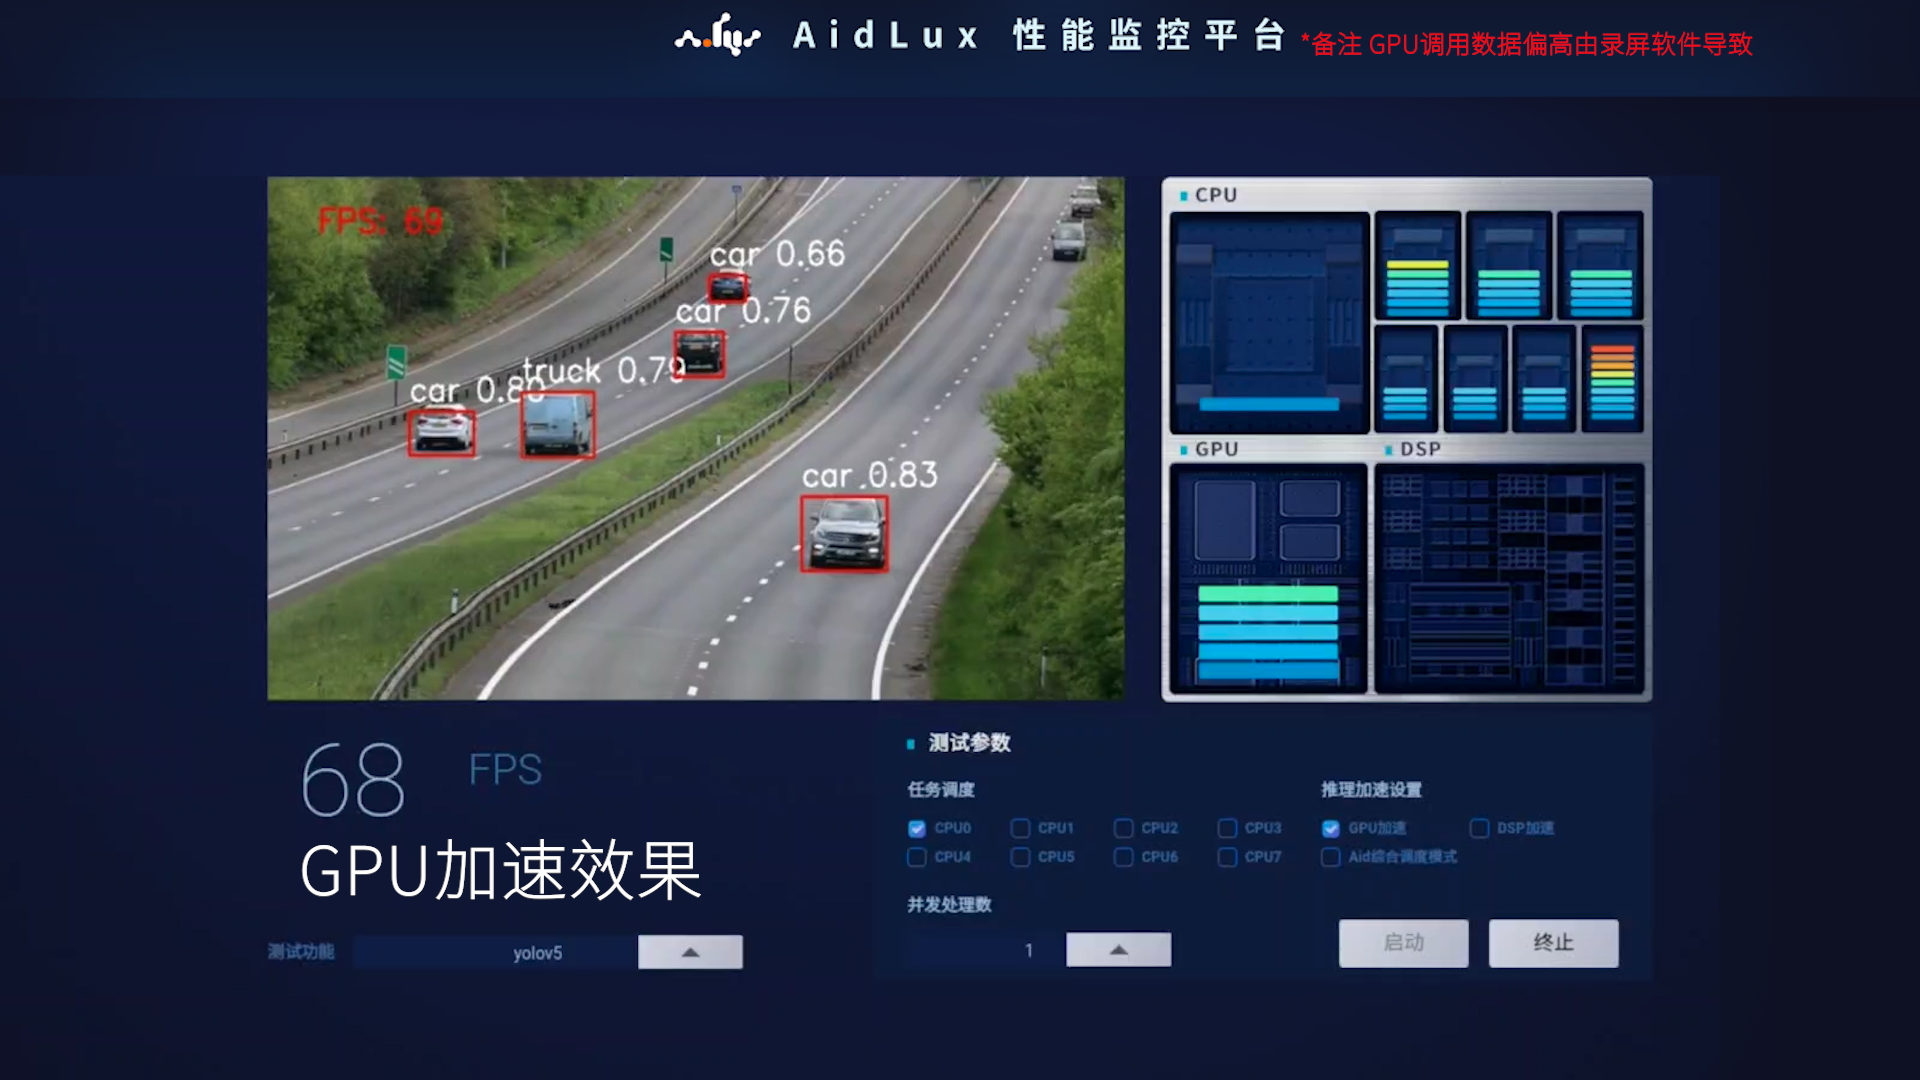
从上图中可以看出GPU与CPU相比的速度优势,且模型越大,速度优势越明显。
部署说明
针对于使用AidLite在AidLux平台上完成AI项目的部署,整个过程主要分为以下几步:
⚠️ 注意: 整个模型从加载到得出结果的步骤分为以上8步,使用者可以在中间穿插逻辑部分。
部署示例
[人脸关键点识别--Face Mesh]
[介绍]
468个人脸关键点精准定位,并支持多个人同时检测,支持关键点3D坐标
目录位置:
cd /opt/aidlux/app/aid-examples/face_det/
运行代码:
python3 run_face_det.py
代码解读:
import time
from time import sleep
import math
import sys
import numpy as np
from blazeface import *
import aidlite
import os
import subprocess
import aidcv as cv2

root_dir = "/sys/class/video4linux/"


def preprocess_image_for_tflite32(image, model_image_size=192):
    image = cv2.cvtColor(image, cv2.COLOR_BGR2RGB)
    image = cv2.resize(image, (model_image_size, model_image_size))
    image = np.expand_dims(image, axis=0)
    image = (2.0 / 255.0) * image - 1.0
    image = image.astype('float32')

    return image


def preprocess_img_pad(img, image_size=128):
    # fit the image into a 128x128 square
    shape = np.r_[img.shape]
    pad_all = (shape.max() - shape[:2]).astype('uint32')
    pad = pad_all // 2
    img_pad_ori = np.pad(
        img,
        ((pad[0], pad_all[0] - pad[0]), (pad[1], pad_all[1] - pad[1]), (0, 0)),
        mode='constant')
    img = cv2.cvtColor(img, cv2.COLOR_BGR2RGB)
    img_pad = np.pad(
        img,
        ((pad[0], pad_all[0] - pad[0]), (pad[1], pad_all[1] - pad[1]), (0, 0)),
        mode='constant')
    img_small = cv2.resize(img_pad, (image_size, image_size))
    img_small = np.expand_dims(img_small, axis=0)
    img_small = (2.0 / 255.0) * img_small - 1.0
    img_small = img_small.astype('float32')

    return img_pad_ori, img_small, pad


def plot_detections(img, detections, with_keypoints=True):
    output_img = img
    print(img.shape)
    x_min = 0
    x_max = 0
    y_min = 0
    y_max = 0
    print("Found %d faces" % len(detections))
    for i in range(len(detections)):
        ymin = detections[i][0] * img.shape[0]
        xmin = detections[i][1] * img.shape[1]
        ymax = detections[i][2] * img.shape[0]
        xmax = detections[i][3] * img.shape[1]
        w = int(xmax - xmin)
        h = int(ymax - ymin)
        h = max(w, h)
        h = h * 1.5

        x = (xmin + xmax) / 2.
        y = (ymin + ymax) / 2.

        xmin = x - h / 2.
        xmax = x + h / 2.
        ymin = y - h / 2. - 0.08 * h
        ymax = y + h / 2. - 0.08 * h

        x_min = int(xmin)
        y_min = int(ymin)
        x_max = int(xmax)
        y_max = int(ymax)
        p1 = (int(xmin), int(ymin))
        p2 = (int(xmax), int(ymax))
        cv2.rectangle(output_img, p1, p2, (0, 255, 255), 2, 1)

    return x_min, y_min, x_max, y_max


def draw_mesh(image, mesh, mark_size=2, line_width=1):
    """Draw the mesh on an image"""
    # The mesh are normalized which means we need to convert it back to fit
    # the image size.
    image_size = image.shape[0]
    mesh = mesh * image_size
    for point in mesh:
        cv2.circle(image, (point[0], point[1]),
                   mark_size, (0, 255, 128), -1)

    # Draw the contours.
    # Eyes
    left_eye_contour = np.array([mesh[33][0:2],
                                 mesh[7][0:2],
                                 mesh[163][0:2],
                                 mesh[144][0:2],
                                 mesh[145][0:2],
                                 mesh[153][0:2],
                                 mesh[154][0:2],
                                 mesh[155][0:2],
                                 mesh[133][0:2],
                                 mesh[173][0:2],
                                 mesh[157][0:2],
                                 mesh[158][0:2],
                                 mesh[159][0:2],
                                 mesh[160][0:2],
                                 mesh[161][0:2],
                                 mesh[246][0:2], ]).astype(np.int32)
    right_eye_contour = np.array([mesh[263][0:2],
                                  mesh[249][0:2],
                                  mesh[390][0:2],
                                  mesh[373][0:2],
                                  mesh[374][0:2],
                                  mesh[380][0:2],
                                  mesh[381][0:2],
                                  mesh[382][0:2],
                                  mesh[362][0:2],
                                  mesh[398][0:2],
                                  mesh[384][0:2],
                                  mesh[385][0:2],
                                  mesh[386][0:2],
                                  mesh[387][0:2],
                                  mesh[388][0:2],
                                  mesh[466][0:2]]).astype(np.int32)
    # Lips
    cv2.polylines(image, [left_eye_contour, right_eye_contour], False,
                  (255, 255, 255), line_width, cv2.LINE_AA)


def draw_landmarks(image, mesh):
    image_size = image.shape[0]
    mesh = mesh * image_size
    landmark_point = []
    for point in mesh:
        landmark_point.append((int(point[0]), int(point[1])))
        cv2.circle(image, (int(point[0]), int(point[1])), 2, (255, 255, 0), -1)

    if len(landmark_point) > 0:
        # 参考:https://github.com/tensorflow/tfjs-models/blob/master/facemesh/mesh_map.jpg

        # 左眉毛(55:内側、46:外側)
        cv2.line(image, landmark_point[55], landmark_point[65], (0, 0, 255), 2, -3)
        cv2.line(image, landmark_point[65], landmark_point[52], (0, 0, 255), 2, -3)
        cv2.line(image, landmark_point[52], landmark_point[53], (0, 0, 255), 2, -3)
        cv2.line(image, landmark_point[53], landmark_point[46], (0, 0, 255), 2, -3)

        # 右眉毛(285:内側、276:外側)
        cv2.line(image, landmark_point[285], landmark_point[295], (0, 0, 255),
                 2)
        cv2.line(image, landmark_point[295], landmark_point[282], (0, 0, 255),
                 2)
        cv2.line(image, landmark_point[282], landmark_point[283], (0, 0, 255),
                 2)
        cv2.line(image, landmark_point[283], landmark_point[276], (0, 0, 255),
                 2)

        # 左目 (133:目頭、246:目尻)
        cv2.line(image, landmark_point[133], landmark_point[173], (0, 0, 255),
                 2)
        cv2.line(image, landmark_point[173], landmark_point[157], (0, 0, 255),
                 2)
        cv2.line(image, landmark_point[157], landmark_point[158], (0, 0, 255),
                 2)
        cv2.line(image, landmark_point[158], landmark_point[159], (0, 0, 255),
                 2)
        cv2.line(image, landmark_point[159], landmark_point[160], (0, 0, 255),
                 2)
        cv2.line(image, landmark_point[160], landmark_point[161], (0, 0, 255),
                 2)
        cv2.line(image, landmark_point[161], landmark_point[246], (0, 0, 255),
                 2)

        cv2.line(image, landmark_point[246], landmark_point[163], (0, 0, 255),
                 2)
        cv2.line(image, landmark_point[163], landmark_point[144], (0, 0, 255),
                 2)
        cv2.line(image, landmark_point[144], landmark_point[145], (0, 0, 255),
                 2)
        cv2.line(image, landmark_point[145], landmark_point[153], (0, 0, 255),
                 2)
        cv2.line(image, landmark_point[153], landmark_point[154], (0, 0, 255),
                 2)
        cv2.line(image, landmark_point[154], landmark_point[155], (0, 0, 255),
                 2)
        cv2.line(image, landmark_point[155], landmark_point[133], (0, 0, 255),
                 2)

        # 右目 (362:目頭、466:目尻)
        cv2.line(image, landmark_point[362], landmark_point[398], (0, 0, 255),
                 2)
        cv2.line(image, landmark_point[398], landmark_point[384], (0, 0, 255),
                 2)
        cv2.line(image, landmark_point[384], landmark_point[385], (0, 0, 255),
                 2)
        cv2.line(image, landmark_point[385], landmark_point[386], (0, 0, 255),
                 2)
        cv2.line(image, landmark_point[386], landmark_point[387], (0, 0, 255),
                 2)
        cv2.line(image, landmark_point[387], landmark_point[388], (0, 0, 255),
                 2)
        cv2.line(image, landmark_point[388], landmark_point[466], (0, 0, 255),
                 2)

        cv2.line(image, landmark_point[466], landmark_point[390], (0, 0, 255),
                 2)
        cv2.line(image, landmark_point[390], landmark_point[373], (0, 0, 255),
                 2)
        cv2.line(image, landmark_point[373], landmark_point[374], (0, 0, 255),
                 2)
        cv2.line(image, landmark_point[374], landmark_point[380], (0, 0, 255),
                 2)
        cv2.line(image, landmark_point[380], landmark_point[381], (0, 0, 255),
                 2)
        cv2.line(image, landmark_point[381], landmark_point[382], (0, 0, 255),
                 2)
        cv2.line(image, landmark_point[382], landmark_point[362], (0, 0, 255),
                 2)

        # 口 (308:右端、78:左端)
        cv2.line(image, landmark_point[308], landmark_point[415], (0, 0, 255),
                 2)
        cv2.line(image, landmark_point[415], landmark_point[310], (0, 0, 255),
                 2)
        cv2.line(image, landmark_point[310], landmark_point[311], (0, 0, 255),
                 2)
        cv2.line(image, landmark_point[311], landmark_point[312], (0, 0, 255),
                 2)
        cv2.line(image, landmark_point[312], landmark_point[13], (0, 0, 255), 2)
        cv2.line(image, landmark_point[13], landmark_point[82], (0, 0, 255), 2)
        cv2.line(image, landmark_point[82], landmark_point[81], (0, 0, 255), 2)
        cv2.line(image, landmark_point[81], landmark_point[80], (0, 0, 255), 2)
        cv2.line(image, landmark_point[80], landmark_point[191], (0, 0, 255), 2)
        cv2.line(image, landmark_point[191], landmark_point[78], (0, 0, 255), 2)

        cv2.line(image, landmark_point[78], landmark_point[95], (0, 0, 255), 2)
        cv2.line(image, landmark_point[95], landmark_point[88], (0, 0, 255), 2)
        cv2.line(image, landmark_point[88], landmark_point[178], (0, 0, 255), 2)
        cv2.line(image, landmark_point[178], landmark_point[87], (0, 0, 255), 2)
        cv2.line(image, landmark_point[87], landmark_point[14], (0, 0, 255), 2)
        cv2.line(image, landmark_point[14], landmark_point[317], (0, 0, 255), 2)
        cv2.line(image, landmark_point[317], landmark_point[402], (0, 0, 255),
                 2)
        cv2.line(image, landmark_point[402], landmark_point[318], (0, 0, 255),
                 2)
        cv2.line(image, landmark_point[318], landmark_point[324], (0, 0, 255),
                 2)
        cv2.line(image, landmark_point[324], landmark_point[308], (0, 0, 255),
                 2)

    return image

def get_cap_id():
    try:
        # 构造命令,使用awk处理输出
        cmd = "ls -l /sys/class/video4linux | awk -F ' -> ' '/usb/{sub(/.*video/, \"\", $2); print $2}'"
        result = subprocess.run(cmd, shell=True, capture_output=True, text=True)
        output = result.stdout.strip().split()

        # 转换所有捕获的编号为整数,找出最小值
        video_numbers = list(map(int, output))
        if video_numbers:
            return min(video_numbers)
        else:
            return None
    except Exception as e:
        print(f"An error occurred: {e}")
        return None


inShape =[[1 , 128 , 128 ,3]]
outShape= [[1 , 896,16],[1,896,1]]
model_path="models/face_detection_front.tflite"
model_path2="models/face_landmark.tflite"
inShape2 =[[1 , 192 , 192 ,3]]
outShape2= [[1,1404],[1]]

# ################################# 模型1
# 创建Model实例对象,并设置模型相关参数
model = aidlite.Model.create_instance(model_path)
if model is None:
    print("Create face_detection_front model failed !")
# 设置模型属性
model.set_model_properties(inShape, aidlite.DataType.TYPE_FLOAT32, outShape,aidlite.DataType.TYPE_FLOAT32)
# 创建Config实例对象,并设置配置信息
config = aidlite.Config.create_instance()
config.implement_type = aidlite.ImplementType.TYPE_FAST
config.framework_type = aidlite.FrameworkType.TYPE_TFLITE
config.accelerate_type = aidlite.AccelerateType.TYPE_GPU
config.number_of_threads = 4

# 创建推理解释器对象
fast_interpreter = aidlite.InterpreterBuilder.build_interpretper_from_model_and_config(model, config)
if fast_interpreter is None:
    print("face_detection_front model build_interpretper_from_model_and_config failed !")
# 完成解释器初始化
result = fast_interpreter.init()
if result != 0:
    print("face_detection_front model interpreter init failed !")
# 加载模型
result = fast_interpreter.load_model()
if result != 0:
    print("face_detection_front model interpreter load face_detection_front model failed !")
print("face_detection_front model model load success!")

# ################################# 模型2
# 创建Model实例对象,并设置模型相关参数
model2 = aidlite.Model.create_instance(model_path2)
if model2 is None:
    print("Create face_landmark model failed !")
# 设置模型参数
model2.set_model_properties(inShape2, aidlite.DataType.TYPE_FLOAT32, outShape2,aidlite.DataType.TYPE_FLOAT32)
# 创建Config实例对象,并设置配置信息
config2 = aidlite.Config.create_instance()
config2.implement_type = aidlite.ImplementType.TYPE_FAST
config2.framework_type = aidlite.FrameworkType.TYPE_TFLITE
config2.accelerate_type = aidlite.AccelerateType.TYPE_GPU
config2.number_of_threads = 4

# 创建推理解释器对象
fast_interpreter2 = aidlite.InterpreterBuilder.build_interpretper_from_model_and_config(model2, config2)
if fast_interpreter2 is None:
    print("face_landmark model build_interpretper_from_model_and_config failed !")
# 完成解释器初始化
result = fast_interpreter2.init()
if result != 0:
    print("face_landmark model interpreter init failed !")
# 加载模型
result = fast_interpreter2.load_model()
if result != 0:
    print("face_landmark model interpreter load model failed !")
print("face_landmark model load success!")

anchors = np.load('models/anchors.npy').astype(np.float32)
aidlux_type="basic"
# 0-后置,1-前置
camId = 0
opened = False
while not opened:
    if aidlux_type == "basic":
        cap=cv2.VideoCapture(camId, device='mipi')
    else:
        capId = get_cap_id()
        print("usb camera id: ", capId)
        if capId is None:
           print ("no found usb camera")
           # 默认用1-前置摄像头打开相机,若打开失败,请尝试修改为0-后置
           cap=cv2.VideoCapture(1, device='mipi')
        else:
            camId = capId
            cap = cv2.VideoCapture(camId)
            cap.set(6, cv2.VideoWriter.fourcc('M','J','P','G'))
    if cap.isOpened():
        opened = True
    else:
        print("open camera failed")
        cap.release()
        time.sleep(0.5)

bFace = False
x_min, y_min, x_max, y_max = (0, 0, 0, 0)
fface = 0.0
while True:
    ret, frame=cap.read()
    if not ret:
        continue
    if frame is None:
        continue
    if camId == 1:
        frame = cv2.flip(frame, 1)

    start_time = time.time()

    img_pad, img, pad = preprocess_img_pad(frame, 128)

    if bFace == False:
        # 设置输入数据
        result = fast_interpreter.set_input_tensor(0, img.data)
        if result != 0:
            print("face_detection_front model interpreter set_input_tensor() failed")
        # 执行推理
        result = fast_interpreter.invoke()
        if result != 0:
            print("face_detection_front model interpreter invoke() failed")
        # 获取输出数据
        raw_boxes = fast_interpreter.get_output_tensor(0)
        if raw_boxes is None:
            print("sample : face_detection_front model interpreter->get_output_tensor(0) failed !")

        classificators = fast_interpreter.get_output_tensor(1)
        if classificators is None:
            print("sample : face_detection_front model interpreter->get_output_tensor(1) failed !")

        detections = blazeface(raw_boxes, classificators, anchors)[0]

        if len(detections) > 0:
            bFace = True
    if bFace:
        for i in range(len(detections)):
            ymin = detections[i][0] * img_pad.shape[0]
            xmin = detections[i][1] * img_pad.shape[1]
            ymax = detections[i][2] * img_pad.shape[0]
            xmax = detections[i][3] * img_pad.shape[1]
            w = int(xmax - xmin)
            h = int(ymax - ymin)
            h = max(w, h)
            h = h * 1.5

            x = (xmin + xmax) / 2.
            y = (ymin + ymax) / 2.

            xmin = x - h / 2.
            xmax = x + h / 2.
            ymin = y - h / 2.
            ymax = y + h / 2.
            ymin = y - h / 2. - 0.08 * h
            ymax = y + h / 2. - 0.08 * h
            x_min = int(xmin)
            y_min = int(ymin)
            x_max = int(xmax)
            y_max = int(ymax)

            x_min = max(0, x_min)
            y_min = max(0, y_min)
            x_max = min(img_pad.shape[1], x_max)
            y_max = min(img_pad.shape[0], y_max)
            roi_ori = img_pad[y_min:y_max, x_min:x_max]
            roi = preprocess_image_for_tflite32(roi_ori, 192)

            result = fast_interpreter2.set_input_tensor(0, roi.data)
            if result != 0:
                print("face_landmark model interpreter set_input_tensor() failed")

            result = fast_interpreter2.invoke()
            if result != 0:
                print("face_landmark model interpreter set_input_tensor() failed")

            mesh = fast_interpreter2.get_output_tensor(0)
            if mesh is None:
                print("sample : face_landmark model interpreter->get_output_tensor(0) failed !")

            stride8 = fast_interpreter2.get_output_tensor(1)
            if stride8 is None:
                print("sample : face_landmark model interpreter->get_output_tensor(1) failed !")
            print(f"stride8.shape: {stride8.shape}")
            ffacetmp = stride8[0]
            print('fface:', abs(fface - ffacetmp))
            if abs(fface - ffacetmp) > 0.5:
                bFace = False
            fface = ffacetmp

            mesh = mesh.reshape(468, 3) / 192
            draw_landmarks(roi_ori, mesh)

            shape = frame.shape
            x, y = img_pad.shape[0] / 2, img_pad.shape[1] / 2

            frame = img_pad[int(y - shape[0] / 2):int(y + shape[0] / 2), int(x - shape[1] / 2):int(x + shape[1] / 2)]

    cv2.imshow("", frame)
视觉应用开发环境
AidCV编程接口
AidCV SDK相关文档请查看:AidCV SDK | AidLux Docs
AidStream编程接口
AidStream SDK相关文档请查看:AidStream SDK | AidLux Docs
AidLux开发环境
编程语言
python
系统内置Python 版本
aidlux@aidlux:~$ python3
Python 3.8.10 (default, Nov 22 2023, 10:22:35)
[GCC 9.4.0] on linux
Type "help", "copyright", "credits" or "license" for more information.
⚠️ 注意: 暂不建议安装conda进行多python环境操作,会导致aidlite等系统自带sdk使用异常。
c/c++
c++的插件只支持x86,不支持arm64,但是换了clang编译器后,c++的插件就支持arm64了。
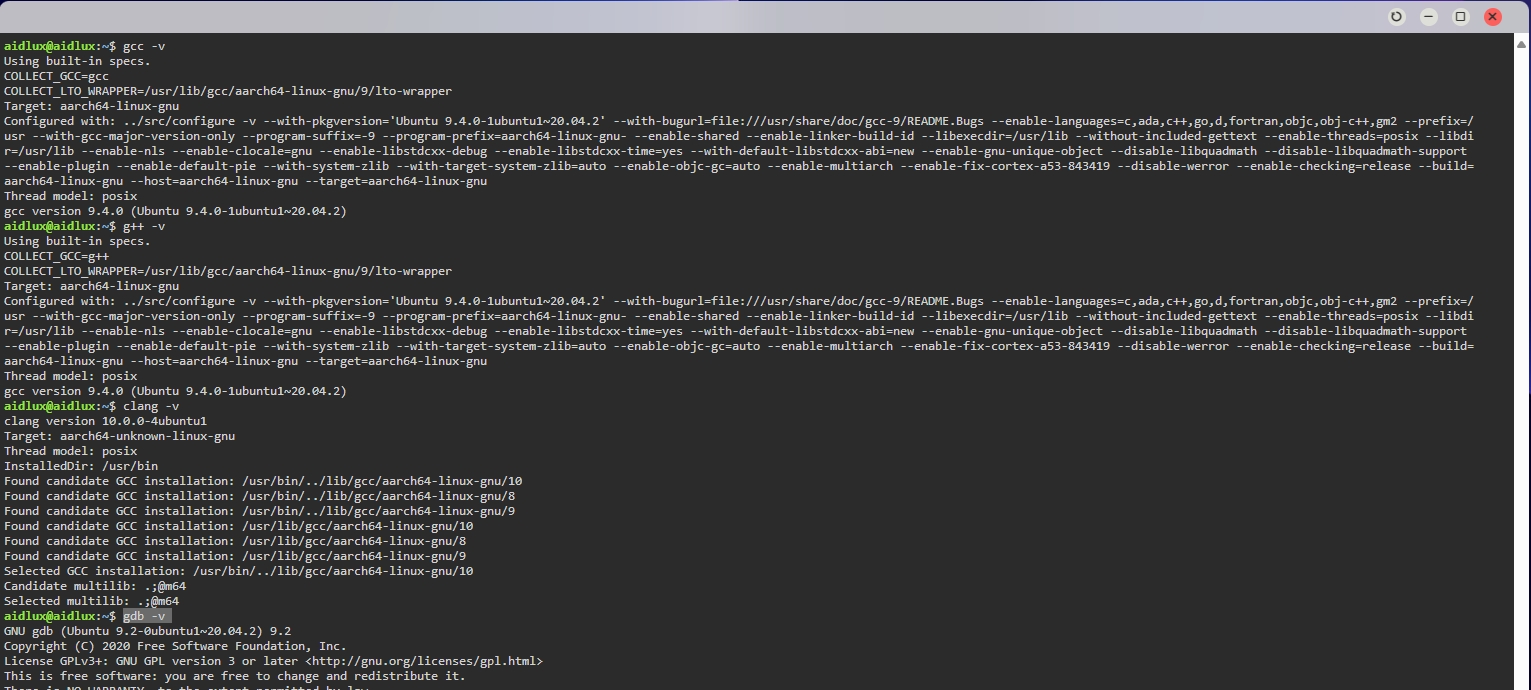
[安装gcc、g++、clang、gdb]
sudo apt install -y gcc g++ clang gdb
[验证安装]
gcc -v、g++ -v、 clang -v、gdb -v
GO
- 更新包索引: 首先,更新您的包索引以确保您安装的是最新版本的软件包。
sudo apt update
- 安装 Go: 您可以通过
apt包管理器直接安装 Go。
sudo apt install golang-go
这将安装 Go 语言环境及其标准库。
- 验证安装: 安装完成后,您可以通过运行以下命令来验证 Go 是否已正确安装:
go version
这将输出已安装的 Go 版本。
- 测试: 新建go.test:
package main
import "fmt"

func main() { fmt.Printf("hello, world\n") }
运行结果如下:
aidlux@aidlux:~$ go run test.go
hello, world
java
- 安装OpenJDK JDK
sudo apt install default-jre
- 验证安装
aidlux@aidlux:~$ java --version
openjdk 11.0.24 2024-07-16
OpenJDK Runtime Environment (build 11.0.24+8-post-Ubuntu-1ubuntu320.04)
OpenJDK 64-Bit Server VM (build 11.0.24+8-post-Ubuntu-1ubuntu320.04, mixed mode)
php
-
安装
sudo apt install php -
查看版本
aidlux@aidlux:~$  php -version
PHP 7.4.3-4ubuntu2.24 (cli) (built: Sep 30 2024 18:16:20) ( NTS )
Copyright (c) The PHP Group
Zend Engine v3.4.0, Copyright (c) Zend Technologies
    with Zend OPcache v7.4.3-4ubuntu2.24, Copyright (c), by Zend Technologies
vue.js
使用nvm(Node Version Manager)
nvm是一个Node.js版本管理器,允许你安装和切换不同版本的Node.js。
-
首先,安装nvm:
wget -qO- https://raw.githubusercontent.com/nvm-sh/nvm/v0.39.1/install.sh | bash -
然后,关闭并重新打开你的终端,或者运行以下命令以启用nvm:
bash
export NVM_DIR="$([ -z "${XDG_CONFIG_HOME-}" ] && printf %s "${HOME}/.nvm" || printf %s "${XDG_CONFIG_HOME}/nvm")"
[ -s "$NVM_DIR/nvm.sh" ] && \. "$NVM_DIR/nvm.sh" # This loads nvm -
安装Node.js:
nvm install node # 安装最新版本
nvm install 16 # 安装特定版本,例如16.x -
检查Node.js版本:
aidlux@aidlux:~$ node -v
v23.0.0
aidlux@aidlux:~$ npm -v
10.9.0
rust
安装
apt install -y rustc rust-src rust-gdb rust-doc rustdoc-stripper
验证安装
aidlux@aidlux:~$ rustc --version
rustc 1.75.0 (82e1608df 2023-12-21) (built from a source tarball)
远程调试
VSCode远程调试
[安装VSCode]
从VSCode官网下载VSCode并且根据提示安装到PC
[安装Remote-SSH]
打开VSCode,点击左侧扩展(Extensions)菜单,输入Remote-SSH,点击安装。
安装完成后,左侧会出现一个新的图标Remote Explorer。
[配置SSH连接]
-
点击左侧
Remote Explorer的SSH TARGETS的添加按钮或VSCode左下角打开一个远程窗口(Open a Remote Window)。 -
输入需要远程连接的AidLux设备IP,
查看设备IP地址,选择
Connect to Host或者
Connect Current Window to Host输入以下命令:
ssh aidlux@ip或者选择
Open SSH Configuration File加入以下内容:
Host AidLux # 服务器别名
 HostName 192.168.1.100 # 填写远程服务器的IP或者Host
 Port 22 # 填写访问远程服务器的端口号
User aidlux # 填写登陆远程服务器的用户的名字 -
根据提示输入密码,AidLux默认密码为
aidlux -
耐心等待VSCode自动在AidLux安装VS Code Server
网络情况正常的情况下一般几分钟左右就能装好,如果长时间未能安装成功,尝试关闭VSCode重新进行SSH连接。
[调试代码]
-
安装成功后,默认就已经连接到AidLux中了。选择左侧的打开文件或文件夹,选择需要调试的文件或文件夹,选择home/aidlux目录为例。

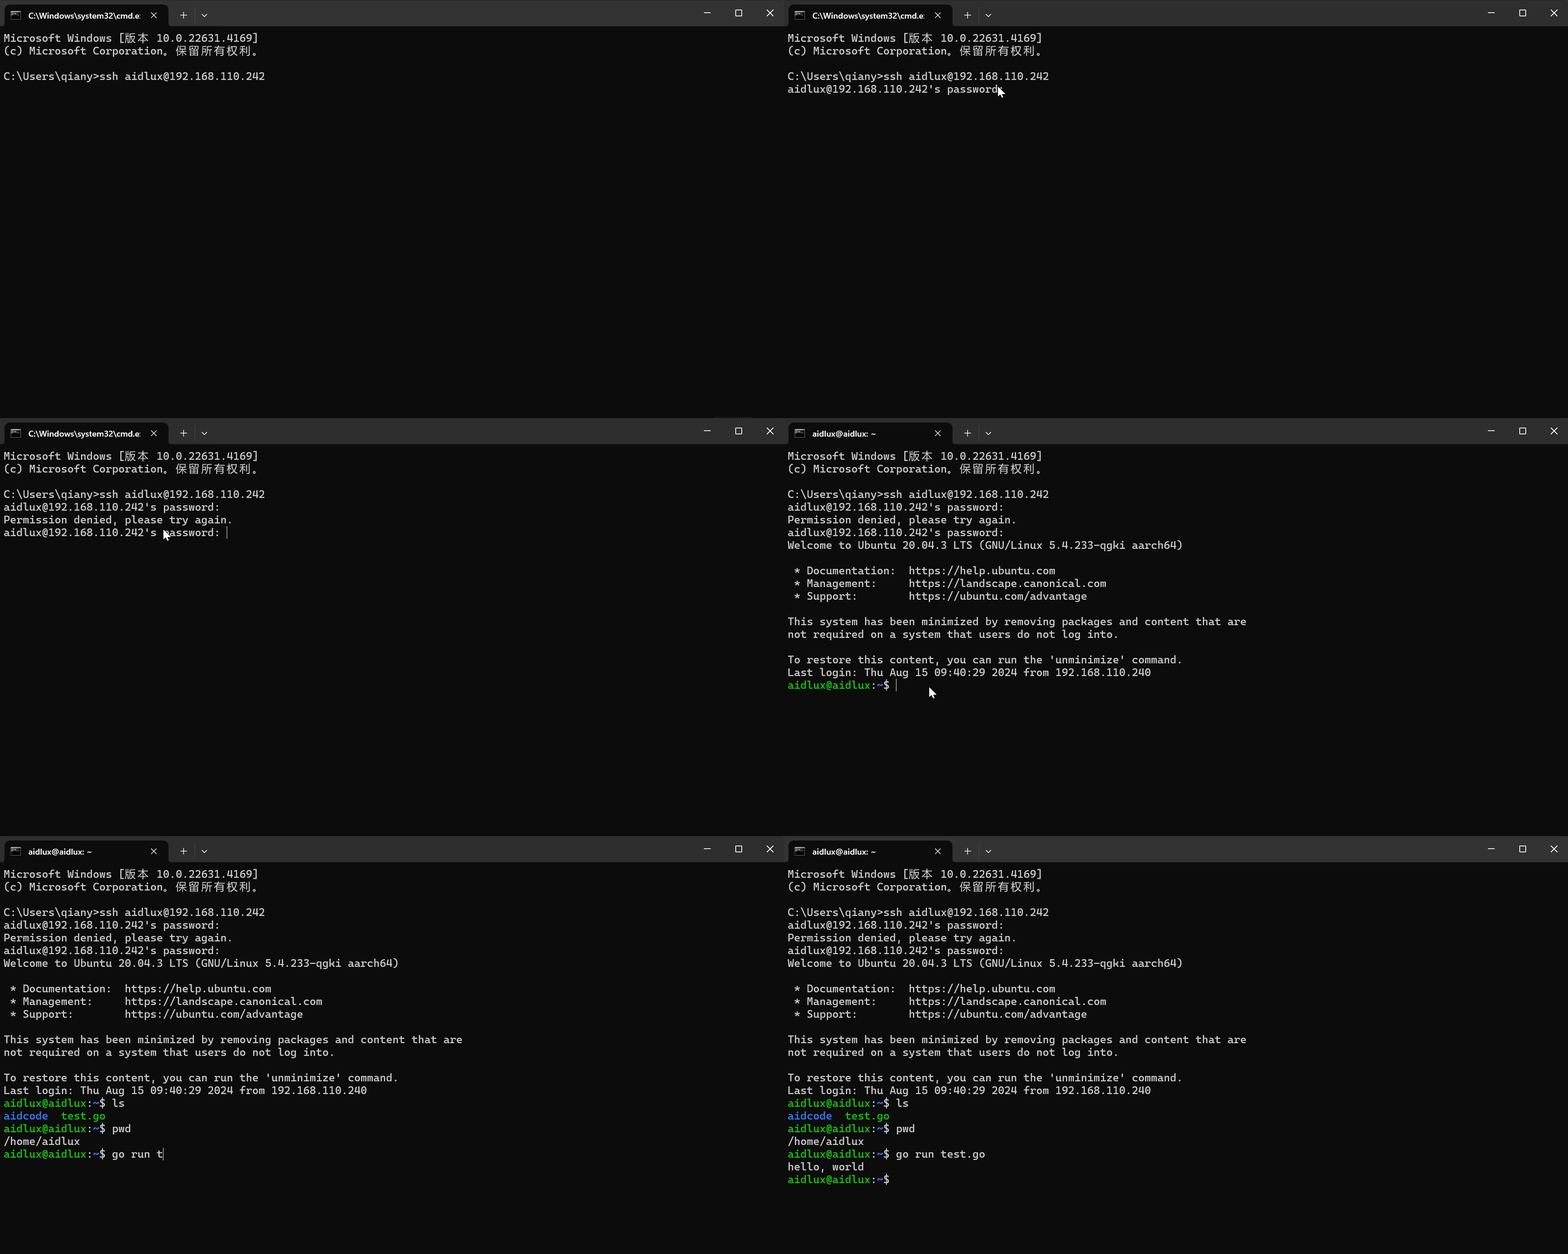
SSH远程调试
打开pc的cmd命令行,输入:
ssh aidlux@ip
password为aidlux,成功连接后即可通过ssh进行远程调试。
开机自启动服务配置
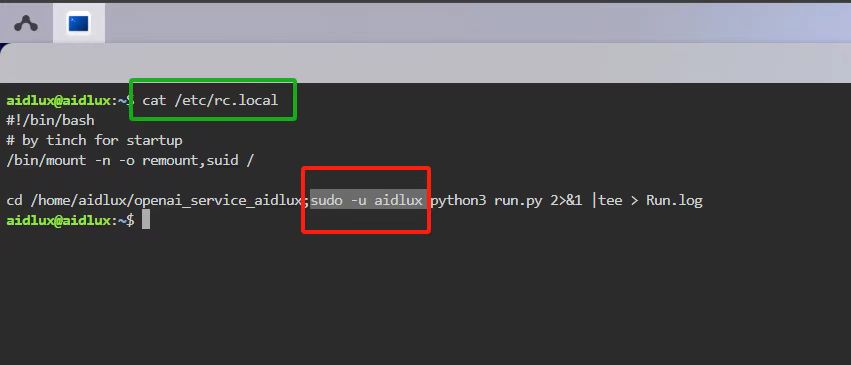
打开终端查看/etc/rc.local配置文件,将需要开机自启动运行的服务程序如下图所示添加到rc.loacl配置文件中,即可完成配置。
cd /home/aidlux/openai_service_aidlux;sudo -u aidluxpython3 run.py
