AidStream 开发者文档
简介
AidStream SDK 是一个基于 GStreamer 的多媒体数据实时处理工具包,适用于构建基于 AI 的视频、图像分析应用和服务。AidStream SDK 提供了基于硬件加速(例如:GPU、VPU、NPU)的 GStreamer 插件,让开发者更快、更简单、更灵活地开发和部署端到端加速的多媒体 AI 应用。
AidStream 是用来构建流媒体应用的视频框架,其目标是简化视频 + AI 应用程序开发中需要插入算法的程序构建。
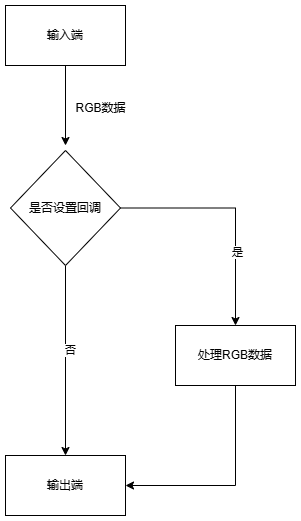
AidStream 基于 pipeline 的概念,AidStream 中的 pipeline 元素非常简单,只分为输入端和输出端,使用函数调用即可。在 pipeline 开始后,SDK 可以在输入端和输出端之间通过回调函数获取 RGB 数据,在回调函数中可以将此 RGB 数据经算法处理后再返回给 pipeline,经处理后的 RGB 数据会继续 pipeline 的后续输出过程。
V3 版本是对之前 AidStream 初始版本的一次重大升级。
AidStream通用流程如下图所示:
板卡性能
具体性能内容可参考点击跳转板卡性能参考
硬件平台与操作系统适配汇总
| 核心平台 | 硬件型号 | 操作系统 | GStreamer插件示例 |
|---|---|---|---|
| QCS8550 | 犀牛派X1/MC940/FV04 | ubuntu2204 | 点击跳转GStreamer插件示例分类一 |
| QCS8625 | QCS8625 | ubuntu2204 | 点击跳转GStreamer插件示例分类一 |
| QCS6490 | AGC6490/犀牛派A1 | ubuntu2204 ubuntu2404 | 点击跳转GStreamer插件示例分类二 |
| QCS6490 | 瑞莎派 | aidlux融合系统(ubuntu2204) | 点击跳转GStreamer插件示例分类三 |
文档使用提示
通用实例分为两种方式
基于GStreamer插件命令的参考代码 点击跳转GStreamer插件示例
通过C++ SDK接口编程参考代码 点击跳转SDK接口示例
GStreamer通用示例参考
tip
<input-stream-url>(自定义输入地址/视频源地址,例如摄像头IP)
例如 "rtsp://admin:aidlux123@192.168.111.236:554/h264/ch1/main/av_stream"
<output-stream-url>(自定义输出地址/流媒体服务器地址)
例如 "rtsp://admin:aidlux123@192.168.111.115:8554/test-111"
安装 AidStream-GST 包后,相应的模型文件在目录 /usr/local/share/aidstream-gst/example/datas/ 下, 使用时请确保模型文件存在
目录 /usr/local/share/aidstream-gst/example/plugines/gst-plugin-customize 旨在方便用户使用,支持将自定义的前后处理操作放入该路径下。
插件类型一
插件类型一 GStreamer插件示例汇总
| 操作平台 | 示例 |
|---|---|
| QCS8550/QCS8625 | 1.点击跳转物体识别 (yolov5) 2.点击跳转物体识别 (yolov8) 3.点击跳转分割 (yolov8) |
| QCS8550(FV04) | 4.点击跳转至示例适用于H264 5.点击跳转至示例适用于H265 6.点击跳转至示例适用纯四合一 |
示例1-基于Aidlite工具链的使用示例-yolov5
gst-launch-1.0 -e rtspsrc location=<input-stream-url> latency=200 protocols=tcp \
! rtph264depay ! h264parse config-interval=-1 ! qtic2vdec ! qtivtransform engine=2 \
! video/x-raw\(memory:GBM\),format=NV12,width=3840,height=2160,framerate=25/1 ! tee name=t \
t. ! queue ! qtimetamux name=mux \
t. ! queue max-size-buffers=4 max-size-bytes=0 max-size-time=0 \
! qtivtransform engine=2 ! video/x-raw\(memory:GBM\),format=BGR   \
! ast-aidlite model=./cutoff_yolov5s_sigmoid_qcs8550_w8a8.qnn236.ctx.bin roi-width=3840 roi-height=2160 box-thresh=0.5 nms-thresh=0.45 ! text/x-raw,format=utf8 ! mux. \
mux.src ! qtioverlay engine=1 ! qtic2venc ! h264parse ! rtspclientsink protocols=tcp location=<output-stream-url>
示例2-基于Aidlite工具链的使用示例-yolov8
gst-launch-1.0 -e rtspsrc location=<自定义输入地址:视频源地址> latency=200 protocols=tcp \
! rtph264depay ! h264parse config-interval=-1 ! qtic2vdec ! qtivtransform engine=2 \
! video/x-raw\(memory:GBM\),format=NV12,width=3840,height=2160,framerate=25/1 ! tee name=t \
t. ! queue ! qtimetamux name=mux \
t. ! queue max-size-buffers=4 max-size-bytes=0 max-size-time=0 \
! qtivtransform engine=2 ! video/x-raw\(memory:GBM\),format=BGR   \
! ast-aidlite model-type=yolov8-detection model=./cutoff_yolov8s_qcs8550_fp16.qnn231.ctx.bin roi-width=3840 roi-height=2160 box-thresh=0.3 nms-thresh=0.3 ! text/x-raw,format=utf8 ! mux. \
mux.src ! qtioverlay engine=1 ! qtic2venc ! h264parse ! rtspclientsink protocols=tcp location=<自定义输出地址:流媒体服务器地址>
示例3-基于Aidlite工具链的使用示例-yolov8分割
gst-launch-1.0 -e \
rtspsrc location=<自定义输入地址:视频源地址> latency=200 protocols=tcp \
! rtph264depay ! h264parse config-interval=-1 ! qtic2vdec ! qtivtransform engine=2 \
! video/x-raw\(memory:GBM\),format=NV12,width=3840,height=2160,framerate=25/1 ! tee name=t \
t. ! queue ! qtivcomposer name=mixer1 ! queue ! qtic2venc ! h264parse ! rtspclientsink protocols=tcp location=<自定义输出地址:流媒体服务器地址> \
t. ! queue max-size-buffers=4 max-size-bytes=0 max-size-time=0 \
! qtivtransform engine=2 ! video/x-raw\(memory:GBM\),format=BGR \
! ast-aidlite-video model-type=yolov8-segmentation model=./cutoff_yolov8s-seg_qcs8550_fp16.qnn236.ctx.bin roi-width=3840 roi-height=2160 box-thresh=0.3 nms-thresh=0.3 \
! video/x-raw\(memory:GBM\),format=BGRA,width=3840,height=2160,framerate=25/1 \
! mixer1.
以下示例主要适用于硬件型号为 FV04
示例4-适用H264
gst-launch-1.0 rtspsrc location=<自定义输入地址:视频源地址> \
! rtph264depay \
! h264parse \
! qtic2vdec \
! qtivtransform engine=2 \
! video/x-raw,format=RGB \
! qtivtransform engine=2 \
! qtic2venc \
! queue \
! h264parse \
! rtspclientsink protocols=tcp location=<自定义输出地址:流媒体服务器地址>
示例5-适用H265
gst-launch-1.0 -e \
rtspsrc location=<自定义输入地址:视频源地址> ! rtph265depay ! h265parse ! qtic2vdec ! \
qtivtransform engine=2 ! video/x-raw\(memory:GBM\),format=NV12,width=3840,height=2160,framerate=20/1 ! qtivtransform engine=2 ! \
queue ! tee name=split \
split. ! queue ! qtivcomposer name=mixer1 ! queue ! video/x-raw,format=NV12,width=3840,height=2176,framerate=20/1 ! qtic2venc ! queue ! h265parse ! mp4mux ! filesink location=./3840_video_4k_20fps.mp4 sync=false \
split. ! queue ! qtimlvconverter name=qmlconvert_1  ! qtimlqnn name=qtimlqnn_1 model=./640_yolov8s_qcs8550_w8a8.qnn228.aarch64.gcc9_4.so  backend=/usr/lib/libQnnHtp.so  ! \
qtimlvdetection threshold=75.0 results=10 module=ml-vdetection-yolov8 labels=./yolov8.labels ! \
video/x-raw\(memory:GBM\) ! capsfilter name=ml_capsfilter ! mixer1.
示例6-适用纯四合一
tip
<1920,1080> 可替换为其他可用分辨率如<3840,2160>
gst-launch-1.0 -e qtivcomposer name=mixer \
sink_0::position="<0, 0>" sink_0::dimensions="<1920, 1080>" \
sink_1::position="<1920, 0>" sink_1::dimensions="<1920, 1080>" \
sink_2::position="<0, 1080>" sink_2::dimensions="<1920, 1080>" \
sink_3::position="<1920, 1080>" sink_3::dimensions="<1920, 1080>" \
! video/x-raw\(memory:GBM\),format=NV12,width=3840,height=2160 ! qtic2venc ! h264parse config-interval=1 ! rtspclientsink protocols=tcp location=<自定义输出地址:流媒体服务器地址> \
rtspsrc location=<自定义输入地址:视频源地址> latency=100 ! rtph264depay ! h264parse config-interval=-1 ! qtic2vdec ! qtivtransform engine=2 ! mixer. \
rtspsrc location=<自定义输入地址:视频源地址> latency=100 ! rtph264depay ! h264parse config-interval=-1 ! qtic2vdec ! qtivtransform engine=2 ! mixer. \
rtspsrc location=<自定义输入地址:视频源地址> latency=100 ! rtph264depay ! h264parse config-interval=-1 ! qtic2vdec ! qtivtransform engine=2 ! mixer. \
rtspsrc location=<自定义输入地址:视频源地址> latency=100 ! rtph264depay ! h264parse config-interval=-1 ! qtic2vdec ! qtivtransform engine=2 ! mixer.
插件类型二
插件类型二 GStreamer插件示例汇总
| 操作平台 | 示例 |
|---|---|
| QCS6490 | 1.点击跳转示例1适用ubuntu2204 2.点击跳转示例2适用ubuntu2404 |
示例1-适用ubuntu2204
gst-launch-1.0 rtspsrc location=<自定义输入地址:视频源地址> \
! rtph264depay \
! h264parse \
! v4l2h264dec capture-io-mode=5 output-io-mode=2 \
! qtivtransform \
! video/x-raw,format=RGB \
! qtivtransform \
! video/x-raw\(memory:GBM\),format=NV12,colorimetry=bt601 \
! v4l2h264enc capture-io-mode=2 output-io-mode=5 \
! h264parse \
! rtspclientsink location=<自定义输出地址:流媒体服务器地址>
示例2-适用ubuntu2404
gst-launch-1.0 rtspsrc location=<自定义输入地址:视频源地址> latency=200 protocols=tcp \
! rtph264depay \
! h264parse \
! v4l2h264dec capture-io-mode=4 output-io-mode=4 \
! video/x-raw,format=NV12,colorimetry=bt709 \
! qtivtransform engine=3 \
! video/x-raw,format=RGB,colorimetry=bt709 \
! qtivtransform engine=3 \
! video/x-raw,format=NV12,colorimetry=bt709 \
! v4l2h264enc capture-io-mode=4 output-io-mode=4 \
! h264parse \
! rtspclientsink location=<自定义输出地址:流媒体服务器地址>
插件类型三
tip
该插件类型适用于以下操作平台和操作系统: 操作平台:QCS6490 操作系统:aidlux融合系统(ubuntu2204) 💡💡6490 aidlux融合系统(ubuntu2204) 执行时请设置以下环境变量💡💡
export GST_PLUGIN_PATH=/opt/ubun20/usr/lib/aarch64-linux-gnu/gstreamer-1.0/ && export
LD_LIBRARY_PATH=/opt/ubun20/usr/lib/aarch64-linux-gnu/:/opt/ubun20/usr/lib:/usr/local/lib/aidlux_opencv/lib/:$LD_LIBRARY_PATH
gst-launch-1.0 rtspsrc location=<自定义输入地址:视频源地址> \
! rtph264depay \
! h264parse \
! qtivdec \
! qtivtransform \
! video/x-raw,format=RGB \
! qtivtransform \
! qtic2venc \
! video/x-h264,profile=baseline \
! h264parse \
! rtspclientsink location=<自定义输出地址:流媒体服务器地址>
SDK示例代码
tip
使用AidStream SDK C++ API编译,需要引入AidStream SDK 头文件:
#include "aidstream.h"
链接时需要指定AidStream SDK so库,例如:
g++ example.cpp -o demo -L/usr/local/lib/ -laidstream-gst -lopencv_core -I/usr/local/include/aidlux/aidstream-gst/ -I/usr/local/lib/aidlux_opencv/include/opencv4/
AidStream SDK 头文件地址: /usr/local/include/aidlux/aidstream-gst/aidstream.h
AidStream SDK 库文件地址: /usr/local/lib/libaidstream-gst.so
在应用程序中,唯一建议使用的接口函数为:
int start_stream(string stream_id, GetImageCB &cb)
该函数配合配置文件/usr/local/share/aidstream-gst/conf/aidstream-gst.conf使用。(由于stream流配置繁多,强烈建议通过配置文件的方式起流)
安装程序自带example示例及相应的CMakeLists.txt,可到安装目录/usr/local/share/aidstream-gst/example/cxx/下查看。具体操作请参考以下介绍。
根据样例程序来实现推拉流(提前配置好公共配置文件)
关于配置文件,请参考点击跳转配置文件。
配置文件为默认公共配置文件 aidstream-gst.conf,位于目录:/usr/local/share/aidstream-gst/conf/ 下。
具体编译执行操作方法如下:
进入/usr/local/share/aidstream-gst/example/cxx/目录,创建build目录,然后进入build目录。
在build目录里执行cmake命令:
在 8550 / 6490 aibox 平台执行:
cmake ..在 6490 QL 平台则执行(这是因为 6490 QL 平台有不同的数据处理方式及不同的推理模型):
cmake -DV4L2=ON ..然后执行 make 命令:
make编译链接成功后会得到4个可执行程序: demo / qnn_rtsp / rtsp / start
设置配置文件之后,通过 start 可执行程序可以快速启动流(关于配置文件,请参考点击跳转配置文件):
# 比如执行以下命令(1为stream id):
start 1
通过 qnn_rtsp 可执行程序可以快速启动自带模型推理的推拉流:
# 与start类似启动:
qnn_rtsp 1
# 模型目录:/usr/local/share/aidstream-gst/example/datas/
通过 rtsp 可执行程序可以快速启动多线程的推拉流,当前示例设置为2个线程的推拉流,可通过修改代码实现多个线程推拉流。
rtsp根据配置文件参数来选择输入输出流
关于配置文件,请参考点击跳转配置文件。
#include <cstdlib>
#include <string>
#include <iostream>
#include "aidstream.h"

using namespace std;
using namespace Aidlux::AidStream;

int8_t my_img_cb(const Image &img)
{
    printf("width: %d, height: %d, fps: %f, id:%s  \n", img.width, img.height, img.fps, img.stream_id.c_str());
    return 0;
}

int main(int argc, char* argv[])
{
    string _idx;
    if (argc > 1)
    {
        _idx = argv[1];
    }
    else
    {
        _idx = "1";
    }

    Aidlux::AidStream::GetImageCB callback = my_img_cb;
    start_stream(_idx, callback);

    return 0;
}
tip
<视频输入源> (例如rtsp://admin:aidlux123@192.168.110.234:554) <视频输出推流> (例如rtsp://192.168.111.115:8554)
读取rtsp流显示,不做任何处理,输出RTSP流到<视频输出推流>/aidstream-gst-rtsp-test
#include <cstdlib>
#include <string>
#include <iostream>
#include "aidstream.h"

using namespace std;
using namespace Aidlux::AidStream;

int8_t my_img_cb(const Image &img)
{
    printf("width: %d, height: %d, fps: %f\n", img.width, img.height, img.fps);
    return 0;
}

int main()
{
    string rtsp_path = "<视频输入源>/h264/ch1/main/av_stream";
    int res = start_stream_input_rtsp(rtsp_path, my_img_cb, StreamType::RTSPSINK, "<视频输出推流>/aidstream-gst-rtsp-test");
    if(res != 0)
    {
        return -1;
    }
    return 0;
}
根据参数同时开启多路流显示,不做任何处理
#include <cstdlib>
#include <thread>
#include <string>
#include <iostream>
#include "aidstream.h"

using namespace std;
using namespace Aidlux::AidStream;

int8_t my_img_cb(const Image &img)
{
    printf("width: %d, height: %d, fps: %f\n", img.width, img.height, img.fps);
    return 0;
}

int main(int argc, char* argv[])
{
    clogger("./aidclog_aidstream_c");
    set_log_level(GSTLogLevel::SINFO);
    Aidlux::AidStream::GetImageCB callback = my_img_cb;

    std::thread t1(start_stream, "1", ref(callback));
    std::thread t2(start_stream, "7", ref(callback));

    t1.join();
    t2.join();

    return 0;
}
模型执行异步处理,可用于模型推理时间较长的场景
tip
由于该部分代码较多,下面仅贴出主函数部分,完整代码请参阅安装文件/usr/local/share/aidstream-gst/example/cxx/qnn_rtsp.cpp (对于6490 ql请参考qnn_rtsp_v4l2.cpp文件)
对于追求实时性的推拉流而言,留给应用程序处理数据的时间窗口极短。比如,当帧率为25帧的时候,时间窗口仅20ms。所以异步处理属于一个折中方案。当模型推理时间太大的时候,异步处理虽能解决,但是在显示方面带来的体验感欠缺仍无法解决。总而言之,实时性与模型推理时间较长是一对不可调和的矛盾。
int main(int argc, char *argv[]) {
    // 日志开关, 一般情况可不设置
    // Aidlux::AidClog::clog_log_to_file("./snpe2_yolov5_multi_");
    // Aidlux::AidClog::clog_set_log_level(Aidlux::AidClog::LogLevel::INFO);

    init_share_mem_vec();

    if (argc < 2) {
        std::cerr << "Parameter missing, param1: streamId[reference /usr/local/share/aidstream-gst/conf/aidstream-gst.conf file]. eg: ./example 7" << std::endl;
        return -1;
    }
    int r = model_init();
    if (r != 0)
    {
        std::cerr << "model init failed" << std::endl;
        exit(1);
    }
    Aidlux::AidStream::GetImageCB callback = myCallback;
    std::set<std::string> validIDs = loadValidIDs();
    std::vector<std::thread> threads;

    bool allIDsFound = true;
    std::string arg = argv[1];
    // 配置文件有id才启线程
    if (validIDs.find(arg) == validIDs.end())
    {
        allIDsFound = false;
    }
    if (!allIDsFound)
    {
        std::cerr << "Parameter has an id that is not included in the configuration file, please check" << std::endl;
        return -1;
    }
    else
    {
        // gstreamer取数据主线程
        threads.emplace_back(start_stream, arg, ref(callback));
        // 启动三个模型推理处理线程
        // 具体启动多少个线程需要依据模型推理时间长短,模型推理时间越长需要启动的线程数越多。比如推理时间在50 ~ 60ms,则启动3个线程已能应对。
        // 如果模型不支持并发,则只需要配置一个推理线程
        threads.emplace_back(update_data, 1);
        threads.emplace_back(update_data, 2);
        threads.emplace_back(update_data, 3);
    }
    for (auto &t : threads)
    {
        if (t.joinable())
        {
            t.join();
        }
    }

    return 0;
}